
I’ve recently upgraded my webinar equipment setup and I wanted to share more about what I did and how you can do the same. First, I need to share two important disclaimers:
- Setting this up comes with many hours of tech frustrations from trying to get it all working together, watching YouTube videos to understand what’s possible and how to do it, contacting tech support, and Amazon returns. I cannot emphasize this enough.
- It can get pricey really quickly. I picked cheaper options whenever I could and still spent close to $2000.
Before I began this process, I was using a Logitech c920 HD webcam for both my camera and microphone. I thought the video quality was quite good, but I didn’t realize how washed out the colors were and how fuzzy it was until I started using my new camera. I also didn’t really appreciate how much better the audio quality could get.
In terms of doing presentations online, it’s been a game changer for me. Check out this short video to see the potential.
So if the idea of doing the same excites you, then the rest of this blog post is about what happens next. I’ll share everything I purchased, all the lessons learned, and everything I wished I knew when I was getting started so it’s all in one place.
I’m going to break this up into two possible setups: camera only and the full package.
- a digital SLR (DSLR) camera (and associated accessories)
- an HDMI to USB converter
- lighting
After a lot of research it became clear that the Sony Alpha cameras were the best options. I wound up buying the Sony Alpha a6000 because it was the most affordable of the bunch. However the a5100, a6100, a6300, or any of the higher end models should work fine too. Note that these links are just for the body of the camera. You also need the lens. There are lots of choices for lenses, but I bought this Sigma 16mm lens and it works great. It gives me good picture in low light and blurs out the background behind me naturally.
You’re going to need some way to mount your camera so it’s suspended in the air above your monitor. I use this mount but you should find what works for your setup. Remember that it’s a 2 lb camera so you don’t want something like a gooseneck mount which will wiggle with every vibration.
You’re also going to need something called a “dummy battery”. The problem is that a camera’s battery won’t even last an hour. So you need something that is shaped like a battery but is actually plugged into an outlet. I use this one and it never needs to be recharged and doesn’t overheat.
At the simplest level, when you’re in a webinar you need two things: a camera and a microphone. The diagram below is a typical setup. If you’re using a laptop, tablet, or phone, then the camera and microphone are likely already built into the device. Either way, there’s a camera and microphone somewhere.
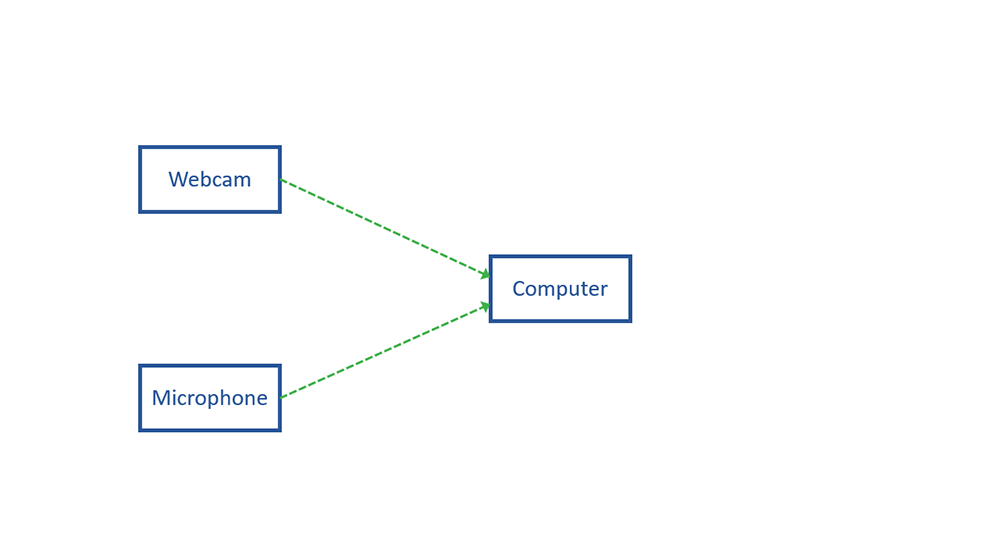
We’re going to create a system where the camera is defined more flexibly and can be anything that outputs HDMI including an actual camera, iPad, document camera, or computer but even things like DVD players and video game systems. Then instead of sending all the audio and video directly to the computer, it’ll go to a device called the ATEM Mini which the computer will treat like a webcam and microphone.
Here’s a diagram of what my setup looks like.

Here’s a picture of what it all looks like together:
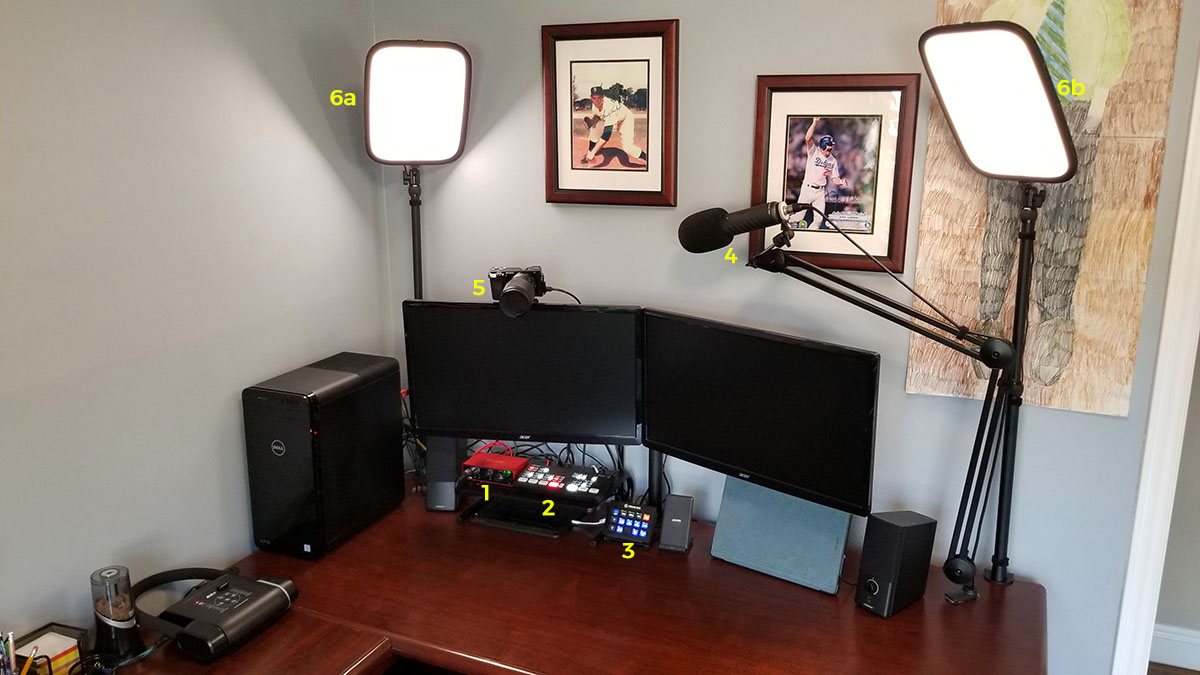
I’ve numbered some of the notable parts and will discuss them in more detail below:
- Focusrite Scarlett Solo (it connects the microphone to the computer)
- Blackmagic ATEM Mini (it is the brains of the setup and directs the video and audio to where it needs to go)
- Elgato Stream Deck (it allows you to control everything with the push of a customizable button)
- Rode Procaster Microphone (it’s the high quality microphone)
- Sony a6000 camera with Sigma 16mm lens
- Elgato Key Lights
I’m personally using the ATEM Mini which meets my needs, but there are two higher end versions in the ATEM Mini Pro ($300 more) and ATEM Mini Pro ISO ($600 more). It has four HDMI inputs and two microphone inputs. So with the push of a button I can switch between sharing my camera, iPad, document camera, or computer.
You’re going to need a cable to connect the ATEM to your computer. If you’re like me and haven’t memorized the exact type of every port in your computer, then you may may need to search online for “_______________ specifications” where the blank is your computer brand and model number. That should take you to something that will tell you what everything in your computer is. You’re looking to see the exact specifications for each of the little slots around your computer.
If you have a “USB 3.1 Type-C” port, then you definitely want to use this cable to connect it to your computer. Otherwise you probably want to search online for “connect atem mini to ____________” before you begin. It should probably not be a big deal, but better to be sure.
This device also gets really hot so I bought this stand to raise it up and get some air circulating underneath it.
- You may have a laptop that has a way to output HDMI
- Your computer may have an additional HDMI output in the video card you’re not using.
- You may be able to use a cable that converts from something like DVI or DisplayPort to HDMI
- If you don’t have any extra HDMI ports, you may be able to use an HDMI splitter so you can take one HDMI feed and duplicate it so that it goes to your monitor and to the the ATEM mini
The first thing you’ll need is a Digital SLR (DSLR) camera. Unfortunately, most DSLR cameras were not designed to be used as webcams. If you already have a DSLR camera, I would search for “Using _________ as a webcam” (put your camera’s model number in the blank) and see what you find. Personally, I already owned two DSLR cameras and neither could be used. Two things you’re looking for if you want to use your DSLR camera are: clean HDMI out (so there’s no text like the date and “REC” when it’s recording) and the ability to plug it in to the wall.
After a lot of research it became clear that the Sony Alpha cameras were the best options. I wound up buying the Sony Alpha a6000 because it was the most affordable of the bunch. However the a5100, a6100, a6300, or any of the higher end models should work fine too. Note that these links are just for the body of the camera. You also need the lens. There are lots of choices for lenses, but I bought this Sigma 16mm lens and it works great. It gives me good picture in low light and blurs out the background behind me naturally.
You’re going to need some way to mount your camera so it’s suspended in the air above your monitor. I use this mount but you should find what works for your setup. Remember that it’s a 2 lb camera so you don’t want something like a gooseneck mount which will wiggle with every vibration.
You’re also going to need something called a “dummy battery”. The problem is that a camera’s battery won’t even last an hour. So you need something that is shaped like a battery but is actually plugged into an outlet. I use this one and it never needs to be recharged and doesn’t overheat.
Personally I am using this fifteen button version but there ones with 6 buttons and 32 buttons too.
Ultimately I found what is perfect for me: the Elgato Key Light. I have two of these and they are worth every penny. They used to be impossible to find but seem to be in stock more often now.
What I love about them includes that:
- they diffuse the light well so that you don’t have bright spots on your body
- they are table mounted
- you can control them remotely from your phone, computer, or Stream Deck so you don’t have to get up and fiddle with settings
- you can separately set both the color and brightness. In my office, the ceiling light makes my right side bright already. So I have my left light set to 31% and my right light set to 8%. Both lights set to 3100K for a warmer color.
Ultimately I settled upon this one and while I’m not great at folding it up, I can hide it away when I’m not using it.
I’m using a desk mount to story it away when I’m not using it and I later bought this pop filter to prevent some sounds from being too loud.
The one recent addition after I upgraded my video was this cable that sends the audio from the microphone to the ATEM Mini.
- plug everything in that needs power
- connect each device to the ATEM Mini by using cables that have HDMI on one end and whatever connects to the device on the other.
- connect the ATEM Mini to your computer (possibly using the USB cable I linked to) and also connect it to the Internet using an ethernet cable (you need to do this to connect it to the Stream Deck)
- mount everything to your desk
There will be a lot of searching on Youtube for “How to connect __________ to _____________.” and “How to set up ________” at this point.
Here are some specific videos that have helped me:
- How to set up your Sony Alpha camera
- How to set up your green screen on your ATEM Mini
- How to connect your Stream Deck to your ATEM Mini
So, here’s a document I’ve made with a running list of instructions for different platforms as I learn them.
To do this, open up the ATEM Mini software. Click on the cog in the lower left corner. Then click on the “Audio” tab. Then click on the “General” subtab. Then under “Analog Audio Inputs”, change the one you are using from “Microphone” to “Line” and click “Done”.
From what I can tell from this thread, this is just the way it is. It takes whites and makes them too white. It also takes blacks and makes them too black. It seems to leave alone the colors in the middle. Unfortunately this is what it does at the ends of the spectrum.
Hey Robert,
I the same audio set as you.
I’m trying to get an Shure SMB7 running into the Focusrite, then through the ATEM for recording livestreams.
I’ve bought a bunch of cables, updated the Focusrite and ATEM software, switched from Mic to Line but I’m still getting nothing out the the audio in to the ATEM.
When I use the Focusrite USB into my computer it works perfectly.
Could you share a link to the cable you’re using and is working from the Focusrite to the ATEM so I can buy it and try it.
Hey Barry.
Here’s the link: https://amzn.to/33XYrd4
It’s also in the part that says “The one recent addition after I upgraded my video was this cable that sends the audio from the microphone to the ATEM Mini.”
Good luck. It’s an awesome setup once you get it going, though there are still a few known issues. If your sound is filled with static, you can read how I handled that too.
Thanks Rob—cable arrived today.
I tried it but still no luck.
I’ve been through a bunch of cables but nothing seems to work via the ATEM. Turned the channel from Mic to Line in the software. I’m starting to think there’s an issue with the Focusrite.
I can record perfectly using the Focusrite USB connection into my laptop—but get no sound when I use the splitter cables into the ATEM. I’ve a lapel mic working on the ATEM using the same connection.
Any ideas?
Do you have Direct Monitor on? I don’t know your exact Focusrite, but I remember not getting sound until I turned that on. I’m also assuming you have your monitor and gain maxed out so that there’s no doubt it’s loud enough to be audible.
Hi Barry,
The SM7B is a low gain microphone and Focusrite Scarlett Solo does not provide sufficient gain for it. You will need a microphone preamp booster for SM7B to be loud enough. Consider adding: 1. sE Electronics DM1 Dynamite Active Inline Microphone Preamplifier OR 2. Cloud Microphones CL-1 Cloudlifter. Check out this tutorial: https://www.youtube.com/watch?v=Tzt0zz84dgM
Barry, Were you ever able to connect your SM7B to your ATEM? If so, how were you able to do it?
Thanks for the post! That was helpful indeed. I’m using my Focusrite solo as my primary audio interface not only for recording my mic but also to hear music and generally computer sounds. Having the Atem Mini now and connecting my Focusrite to Atem’s Mic1 via a line-in, requires you, of course, to have a direct monitor on for Focusrite to send the mic via line-in, therefore you cannot use the Focusrite anymore as your speakers audio interface since your mic will also be coming out of the speakers, and you don’t want to have that. I’m now using my computer’s onboard audio for my speakers and the Focusrite is dedicated only to handling my mic, which is kind of a bummer honestly speaking.
Robert, allow me to mention a few things I’ve done for my setup that might help you and others as well.
1. For the stand I went for a 3D printed solution because a generic stand would be too bulky for my needs. I used the 5th stand here https://www.thingiverse.com/thing:4501820, I downloaded the STL file and asked a friend of mind to 3D print it with black PLA. There are also online services that do 3D printing and they are very affordable.
2. Your issue with white being too white and black being too black is because of the contrast issue that MJPEG has, which is what Atem Mini uses for USB video. Since I already had an Elgato Camlink 4K, and since I own an Atem Mini, not a Mini pro (or IOS), and since I wasn’t using the preview functionality, I plugged the HDMI-out of my Atem to the Elgato Camlink 4K and the colours are much more accurate compared to via USB connection.
3. Even though that I can monitor the audio coming out of my Focusrite with headphones from its headphone port, the end audio that ends up on the stream (or recording) coming from Atem, and there are times that by accident I pressed the On button of the audio of a camera and it ruined my sound, for that reason I bought this HDMI audio extractor (https://www.easycoolav.com/products/avfabul-hdmi-audio-extractor-hdmi-in-hdmi-out-with-spdif-coaxial-stereo-audio-outputaudio-visual-receiver) which does the job for a fair price, that way I can plug my headphones to this little device and hear the sound that will end up in audience ears, allowing me to quickly react in case of an unwanted result. That solution also applies for those who do not own any external audio interfaces and want to be able to monitor their sound, since Atem doesn’t have an audio-out port, this way you can do it.
4. My GPU has 5 outputs, two DP, two HDMI and one DVI-D. I have maxed out my GPU with two 4k Monitors (3840×2160@60Hz each), two 2K ultrawide monitors (3440×1440@60Hz each) and one QHD monitor (1440×2560@60Hz) rotated in 90º, therefore ended up with the issue of not being able to output my central screen to Atem. If you thought of a splitter you are correct, but, after A LOT of searches I wasn’t able to find a splitter that will allow my central monitor to keep performing at 4K@60Hz, all the splitters I came across downgrade the output from 60Hz to 30Hz, which wasn’t an option for me. I found that the only splitter that worked for me was this: https://www.easycoolav.com/products/4k60-hdmi-splitter-1×2-dolby-vision-hdr-scaler-edid-setting-sp12h2, it is from the same company that I mentioned previously, and in no means, I have an affiliate with them, it just happens to come across the company and after talking with them and asking a few questions, I ended up buying the two products. The good part is that this splitter allowing you to scale one (or both) of HDMI out ports from 4K to 1080p, which is cool for Atem, even though that Atem will downscale it, it is good to provide it with a proper feed beforehand, saving that way some processing power from it.
So far those 4 things are what took me quite a while to troubleshoot, I haven’t figured out yet why my Atem mini freezes when I feed it with my Chromecast Google TV, also, I still would love to be able to use my Focusrite as my audio interface when not streaming or recording without the need to change my default audio interface each time before and after stream/recording.
Thanks for making time to share this with me, Panagiotis. I haven’t heard that rationale for the extreme whites and blacks so I’ll check it out.