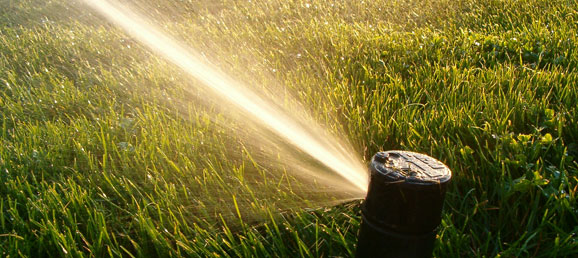
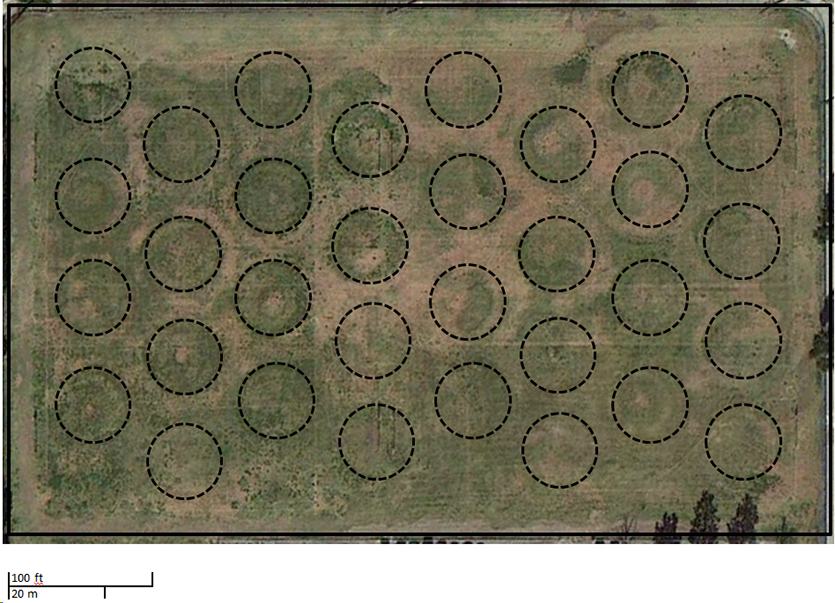
- How can we water all of the grass?
- How can you communicate the changes you would like to make to the sprinklers?
These questions may be useful in helping students down the problem solving path:
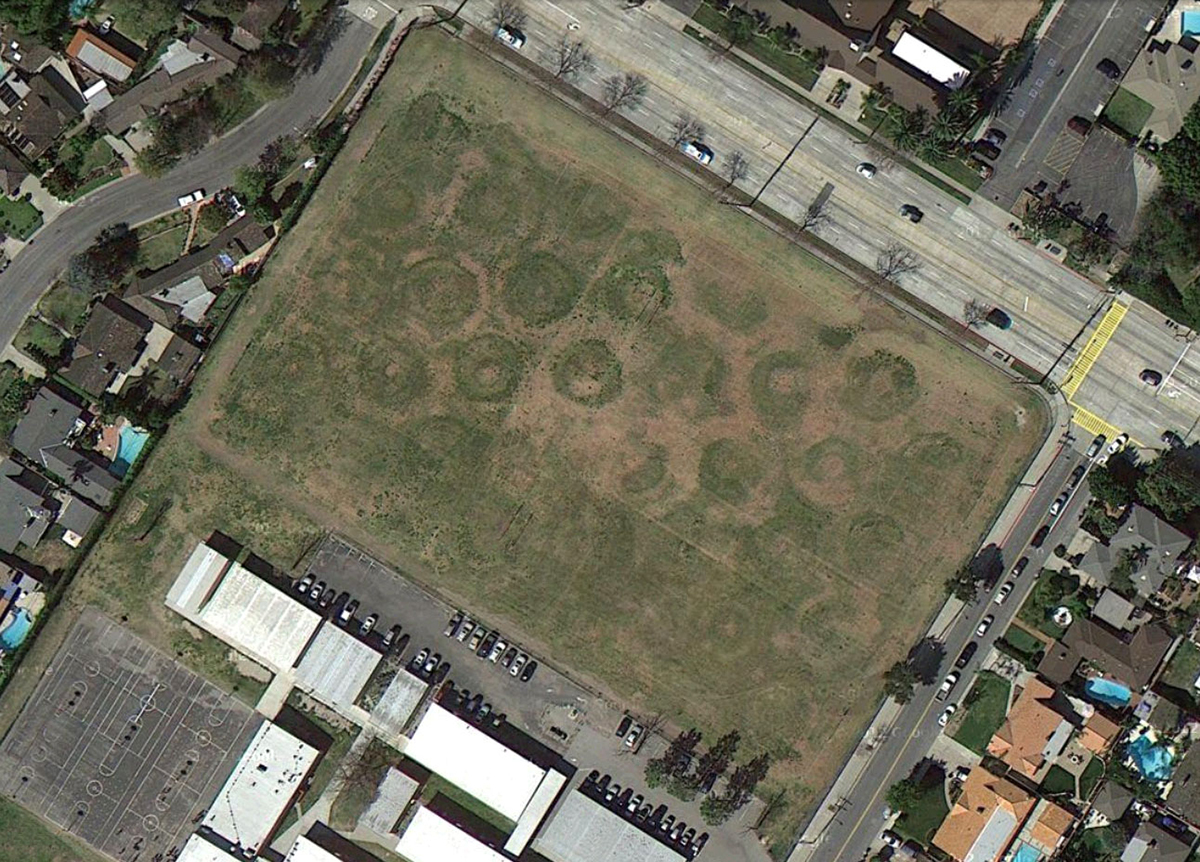
- Do you notice anything unusual about this field?
- What might cause those circles to form?
- What information do we need to determine the distances?
- How can we figure out the sprinkler’s exact location?
This lesson can be as structured or as open-ended as you feel comfortable with, depending on the assumptions made. For example:
- Are we assuming that the sprinklers’ spraying radius cannot be increased? If it could be increased, clearly the sprinklers would cover more area.
- What about watering things other than grass? Is it OK if the parking lot, classrooms, streets, or neighboring houses get watered?
- Can students dig up the field and put in a completely new sprinkler arrangement?
- Can the areas that sprinklers spray overlap?
I suggest beginning this lesson by asking students if they notice anything unusual about the field. Once they notice the circles, have a discussion about where they came from until they realize they’re from the sprinklers. From my experiences, most people do not realize that they are from sprinklers and believe that they are from the way the grass was planted, mowed, or used by the students.
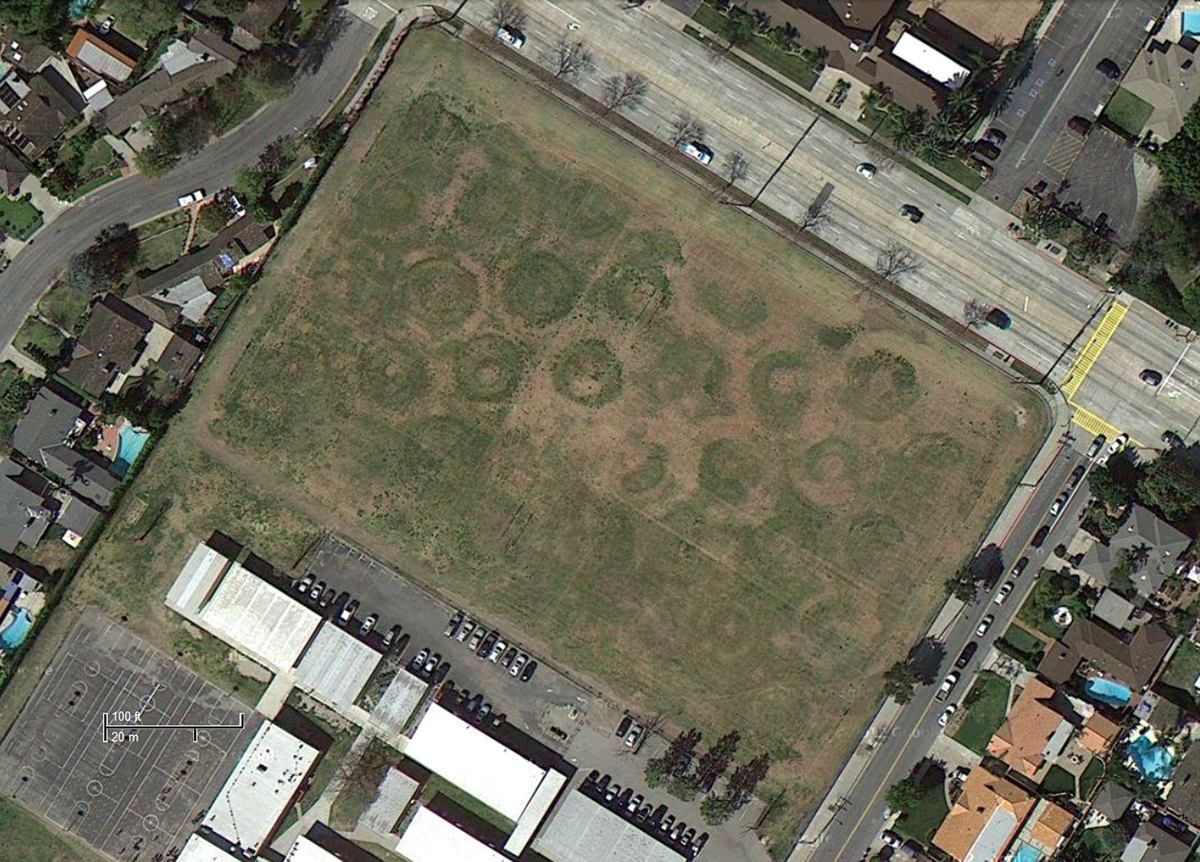
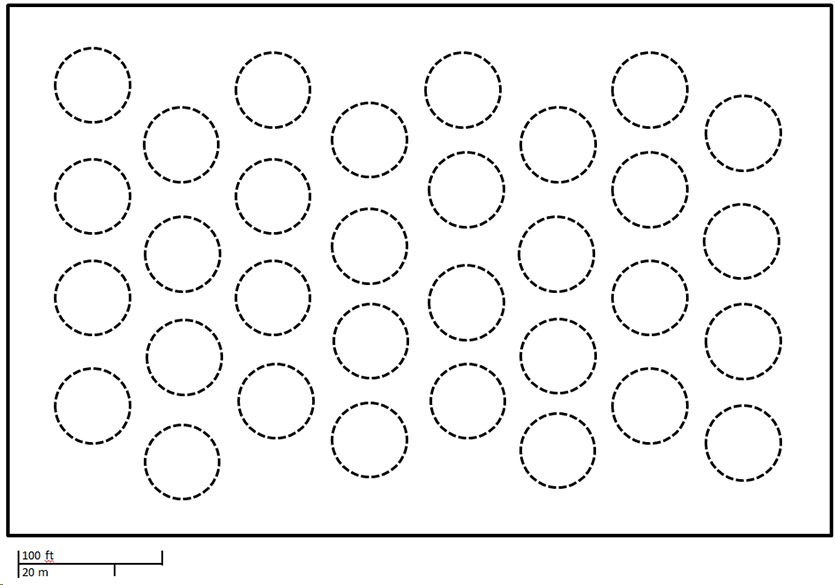
Once students understand the context, it is important to get everyone on the same page regarding the field’s dimensions, sprinkler locations, and their spraying radius. Students should eventually realize that they need to know the scale to have accurate measurements. Once students request it, provide them with this similar map that has the correct scale added to the lower left corner (the scale is easier to read if you click the image to view the larger version).
Have students find the field’s dimensions and the sprinklers’ spraying radius. Here is a list of some of the measurements I took and am assuming throughout the problem:
- If you approximate the field’s shape as a rectangle, the shorter side is ~367 feet and the longer side is ~567 feet.
- The grass circles’ diameters vary but are around 50 feet, so the sprinklers’ spraying radius is ~25 feet.
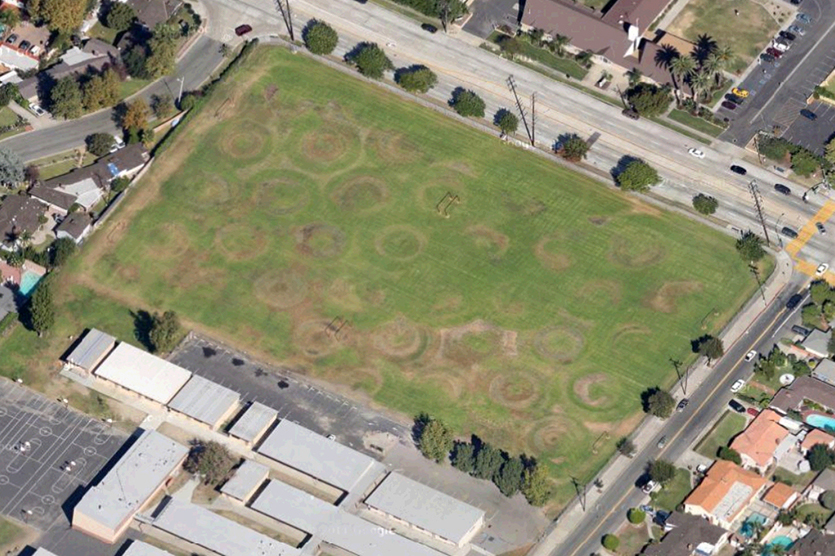
One problem I had that students may also have is identifying all of the sprinklers’ locations. I found a different Google Map image of the same field taken from a 45 degree angle. I can’t explain why the grass pattern seems almost inverted but it is useful for identifying hard to see sprinklers:
I suggest working as a class to identify the individual sprinklers. Once everyone is on the same page regarding their locations, provide them with one of the two maps below:
One assumption I made that you can share with students is that sprinklers can be configured to spray in full circles or half-circles. As for the other assumptions, I suggest letting students choose and clearly list their choices and then let them approach the problem accordingly. Also, if students are looking for more of a challenge, tell them to assume that the water can only touch the grass. Below are approaches I have taken for reference. I have ordered them from easiest to most challenging.
Assumptions:
- Sprinkler radius: variable
- Water non-grass: allowed
- Dig up field: no
- Sprinkler overlap: yes
This scenario is perhaps the least realistic as it is unclear whether we could even increase the spraying radius if we wanted to. It would have the additional problems of spraying streets, cars, and neighboring houses too. However, it is the easiest approach and assumes that instead of adding new sprinklers or moving existing sprinklers, we can just increase the distance the sprinklers spray.
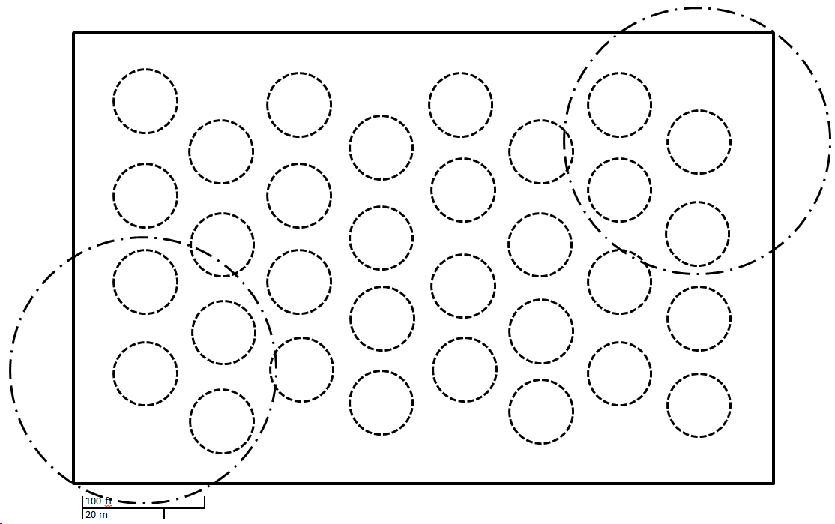
If students take this approach, encourage them to find the minimum distance they would need to spray. Otherwise they could say the sprinklers spray with a 1000 feet radius and be done. To find the minimum distance, students need to figure out the longest distance between grass and a sprinkler head. Due to the sprinklers’ arrangement, the longest distances are along the field’s perimeter. Using a ruler to take an accurate measurement and setting up a proportion I determined that the sprinklers would need to increase their spraying radius to ~105 feet to cover all the grass. That means they would have to spray ~4.2 times farther. The image below illustrates this more clearly. The larger circles show what the increased sprinkler radius would have to be. Note that I have only drawn two of the sprinklers with larger circles but all of them would be larger.
To communicate the changes I would like to make to the sprinkler, I would tell someone to increase the spraying radius to ~105 feet or increase their spraying radius by ~4.2 times.
Potential Extension Questions:
- How much farther beyond the field will the sprinklers reach?
- How much area outside the field is being watered?
Assumptions:
- Sprinkler radius: fixed
- Water non-grass: no
- Dig up field: yes
- Sprinkler overlap: yes
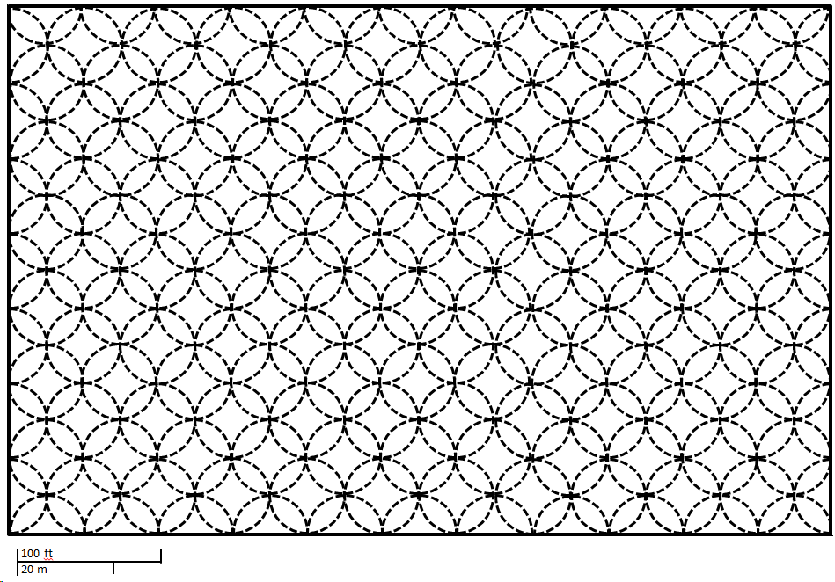
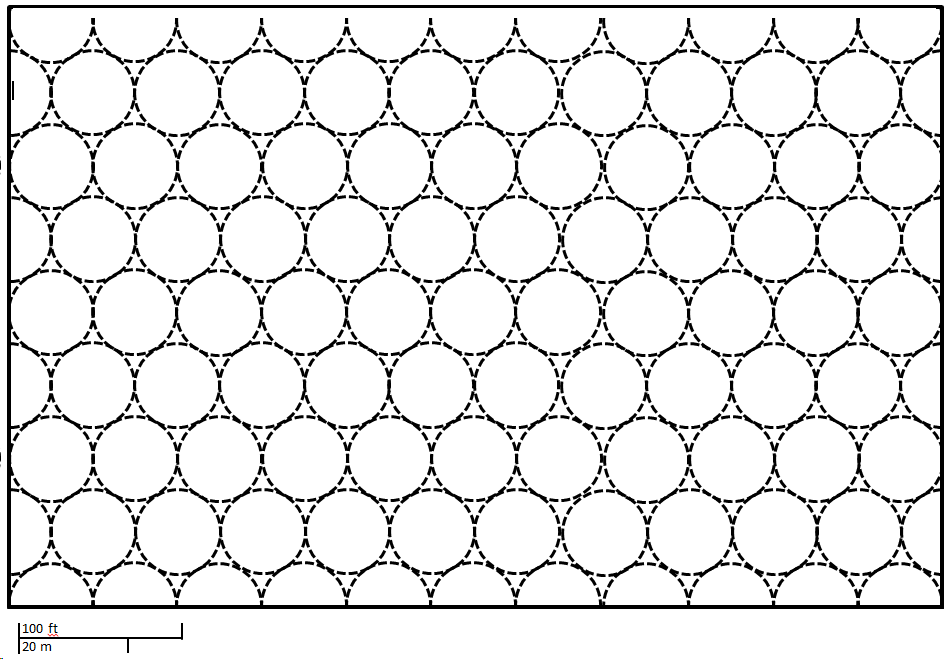
This scenario is more realistic in that all of the grass and only the grass gets watered. However it is also unrealistic as it uses over five times as many sprinklers that all overlap. To begin this problem I arranged sprinklers that only sprayed in a half-circle pattern along one of the field’s sides. Then I placed sprinklers within the field so that its spraying radius was tangent to the next sprinkler’s spraying radius. The picture below illustrates this pattern more clearly.
I should note that when I did this problem on paper, I did not complete this pattern. I did most of the first row and some of the second row before I realized what the pattern was. This is an example of what we want students to do with “Look for and express regularity in repeated reasoning.” (Math Practice 8).
In total I had 8 rows of 11 sprinklers and 7 rows of 12 sprinklers for a total of 172 sprinklers (8*11 + 7*12). Something that may be a potential misunderstanding for students is that of the 172 sprinklers, 136 are full circles and 36 half-circles. The 36 half-circles are not the same as 18 full circles because you cannot split a sprinkler into two halves.
To communicate the changes I would like to make to the sprinklers, I would give someone the diagram and explain that all sprinklers within a row should be placed 50 feet apart. Each row should begin 25 feet away from the next row. Sprinklers rows should alternately begin shifted 25 feet horizontally.
Potential Extension Questions:
- What portion of the field is being watered by more than one sprinkler?
Assumptions:
- Sprinkler radius: fixed
- Water non-grass: no
- Dig up field: yes
- Sprinkler overlap: no
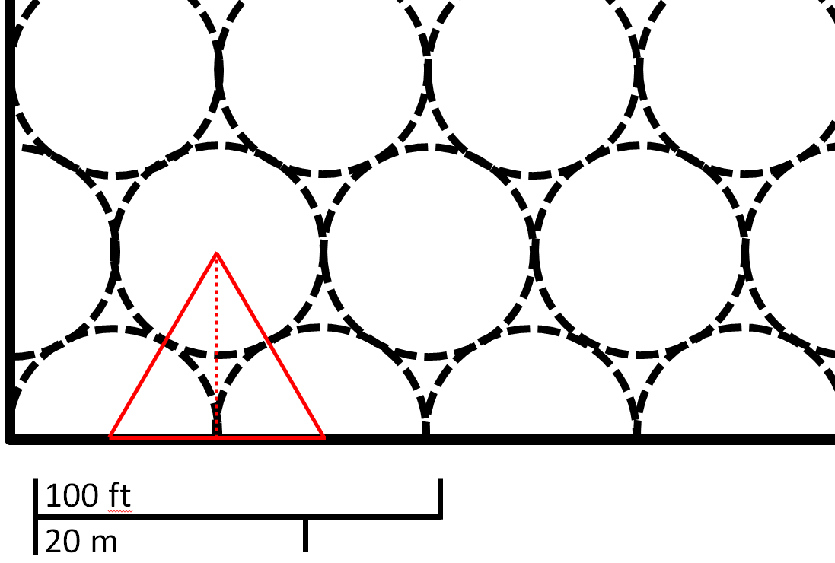
This scenario is the most realistic but it only waters most and not all of the grass. The first row of sprinklers is placed identically to the the overlapping sprinkler configuration, however the next row is shifted 25 feet horizontally. The image below illustrates this configuration. Notice that the top row of sprinklers does not cover a portion of the field at the top of the image (more on this below).
Determining the location of the circle centers starting with row 2 requires making a few realizations. First, if you make a set of three circles and connect their centers by drawing lines, you create an equilateral triangle with side lengths that are two radii long, or ~50 feet. At this point you can either use the Pythagorean Theorem or trigonometric ratios (half the equilateral triangle makes a 30/60/90 right triangle) to determine that the dotted red line is ~43.3 feet.
Regarding the portion of the field at the top of the image that is missing some of the sprinklers, each row of sprinklers is ~43.3 feet away from the next one. Dividing the field’s width by the width of the row (367 ÷ 43.3) gives us enough room for ~8.47 rows. In this particular case I have 7 complete rows and two half rows for a total of 8 rows. The missing piece at the top should represent the 0.47 rows but apparently I didn’t lay the rows out well enough to accurately depict that. Also, I stopped the top row as a half row because it would spray off the field if I made it spray behind it.
To communicate the changes to make to the sprinklers, I would give someone the diagram and explain that all sprinklers within a row should be placed 50 feet apart. Each row should begin ~43.3 feet away from the next row. Sprinkler rows should alternate, being shifted 25 feet horizontally.
Potential Extension Questions:
- How much of the field is not being watered?
- How much would you have to increase the original sprinklers’ spraying radius to make the pattern closer to this one?
One last thing to consider, if the conversation goes there, is the challenge of approximating area using circular units instead of square units. Students may also realize that the larger the spraying radius circles, the larger the space between them. Conversely, the smaller the spraying radius circles, the smaller the space between them. If you had an infinite number of infinitely small circles, you would have the entire area covered.
Update
Thanks to Jim Hays for directing me to this page with extensive examples of circles covering squares. It lists many other options students may choose to cover their field.
- CCSS 7.G.4 Know the formulas for the area and circumference of a circle and use them to solve problems; give an informal derivation of the relationship between the circumference and area of a circle.
- CCSS 8.G.7 Apply the Pythagorean Theorem to determine unknown side lengths in right triangles in real-world and mathematical problems in two and three dimensions.
- CCSS G-SRT.8 Use trigonometric ratios and the Pythagorean Theorem to solve right triangles in applied problems.
- CCSS G-MG.1 Use geometric shapes, their measures, and their properties to describe objects (e.g., modeling a tree trunk or a human torso as a cylinder).
- CCSS G-MG.3 Apply geometric methods to solve design problems (e.g., designing an object or structure to satisfy physical constraints or minimize cost; working with typographic grid systems based on ratios).

