
I must begin by giving a huge thank you to everyone at the Extended Reality Initiative at Kent State and especially to Karl Kosko who has patiently answered my countless questions. While I had dreamed of a future with 360 degree classroom video being used in professional development, I thought it was still years away. I had no idea that they had already been doing this since 2019 and had many resources to share. I would still be dreaming and not doing if it wasn’t for them.
I want to show you what it looks like, and it’s by far the best experience on a VR headset. If you don’t have one, a phone, tablet, or other mobile device will suffice. If your only option is a computer, then you can get an idea of what it’s like.
- VR headset users – Open up the YouTube VR app and search for “Open Middle Closest To One”. Use headphones for the best experience. The clip below starts at 19:37.
- Phone, tablet, and other mobile device users – Open up the YouTube app and search for “Open Middle Closest To One”. Then watch this video in full screen and slowly move your phone around so that you can see the entire classroom. Use headphones for a better experience. The clip below starts at 19:37.
- Computer users – Watch the video below in full screen. Click on the video and drag it so you can look around the room. Use headphones for a better experience.
The first thing you should do is try looking around the classroom. You can literally look everywhere. Here’s a scavenger hunt for practice. Can you find the coffee container on the table? Can you find the classroom clock? Can you find the student in the red hoodie? Can you find count von Count from Sesame Street?
Now, notice how the direction that voices are coming from change depending on what you’re looking at so it feels more realistic.
The video below shows some absolutely incredible high school freshman working on this Open Middle problem. You could watch this video At 19:37 into the video, they are debating whether 79/81 or 81/79 is closer to one. The student in the light gray hoodie believes they are equally close to one because he used a calculator and rounded to the thousandths place. The other students are trying to convince him otherwise. Watch it until 21:31.
Now, watch a little more and look around the room. Just like being in the classroom, you can choose what you want to pay attention to. For example you can see people at the table in front of them and see how they’re progressing through the problem. I hope that the potential here excites you as much as it excites me. It can make classroom videos feel far more realistic and immersive than anything that’s come before.
Here’s what David Poras had to say about the experience:
One of the highlights of my @CAMathCouncil symposium was watching some of @robertkaplinsky 360 degree videos of students talking math. So cool to feel like you were actually in a classroom. Amazing job by Robert to take a risk with a new technology! Sorry – didn’t get any pics!
— David Poras (@davidporas) November 6, 2022
Here are some teachers using it during a presentation.


If you’re loving this and want to know how to do the same thing, I’ve detailed everything I’ve learned below.
Camera
The camera I’m using and recommend is the Insta360 ONE X2. From everything I can tell, it’s currently the best consumer level camera. There are professional level cameras that cost over $4000 but I was not considering those.
Update 12/9/2025
I decided to upgrade to the Insta360 X5. It is an 8K camera and is better in low light situations like classrooms (instead of bright light situations like outside in the sunshine). I’ve now tested it three times and the video quality is MUCH improved and absolutely worth getting.
Microphone
I recommend using the Zoom H3-VR microphone (no relation to the Zoom online meeting company).
It allows you to capture sound in 360 degrees, which is critical because we want to hear what we’re looking at a higher volume and more clearly than what’s behind us. A regular microphone can’t do this. This device consists of four separate microphones strategically placed to capture sound from all directions. It comes with an adapter to allow you to mount it directly underneath the camera as well as a foam cover to reduce popping noises. If you plan on filming anywhere windy, you may want this microphone cover as well. The microphone also has a digital level built in so you can see if it’s tilted.
Micro SD cards
Both devices save to a Micro SD card so you’re going to need two of them. They’re fairly affordable but here’s what you should know. The camera seems to record ~1 GB for every 1.25 minutes of video or ~48 GB for an hour of video. The microphone seems to record ~1 GB for every 30 minutes of audio or ~2 GB for an hour of audio. I initially purchased a 128 GB Micro SD card for my camera and 32 GB micro SD card for my microphone. These sizes allowed me to record around 2.5 hours of video and 16 hours of audio. I later bought a 256 GB Micro SD card to use in the camera instead.
Stand
If you already own a tripod, you can absolutely use that. The one thing to consider is that the bigger the stand, the more visible it will be in the video as the camera is capturing everything. These tripods have very low profiles and minimally show up in the video. Note that if there’s a chance you may eventually get two cameras, it could be worth paying $89.99 for a two pack instead of $69.99 for just one. It come with a bag for each tripod.
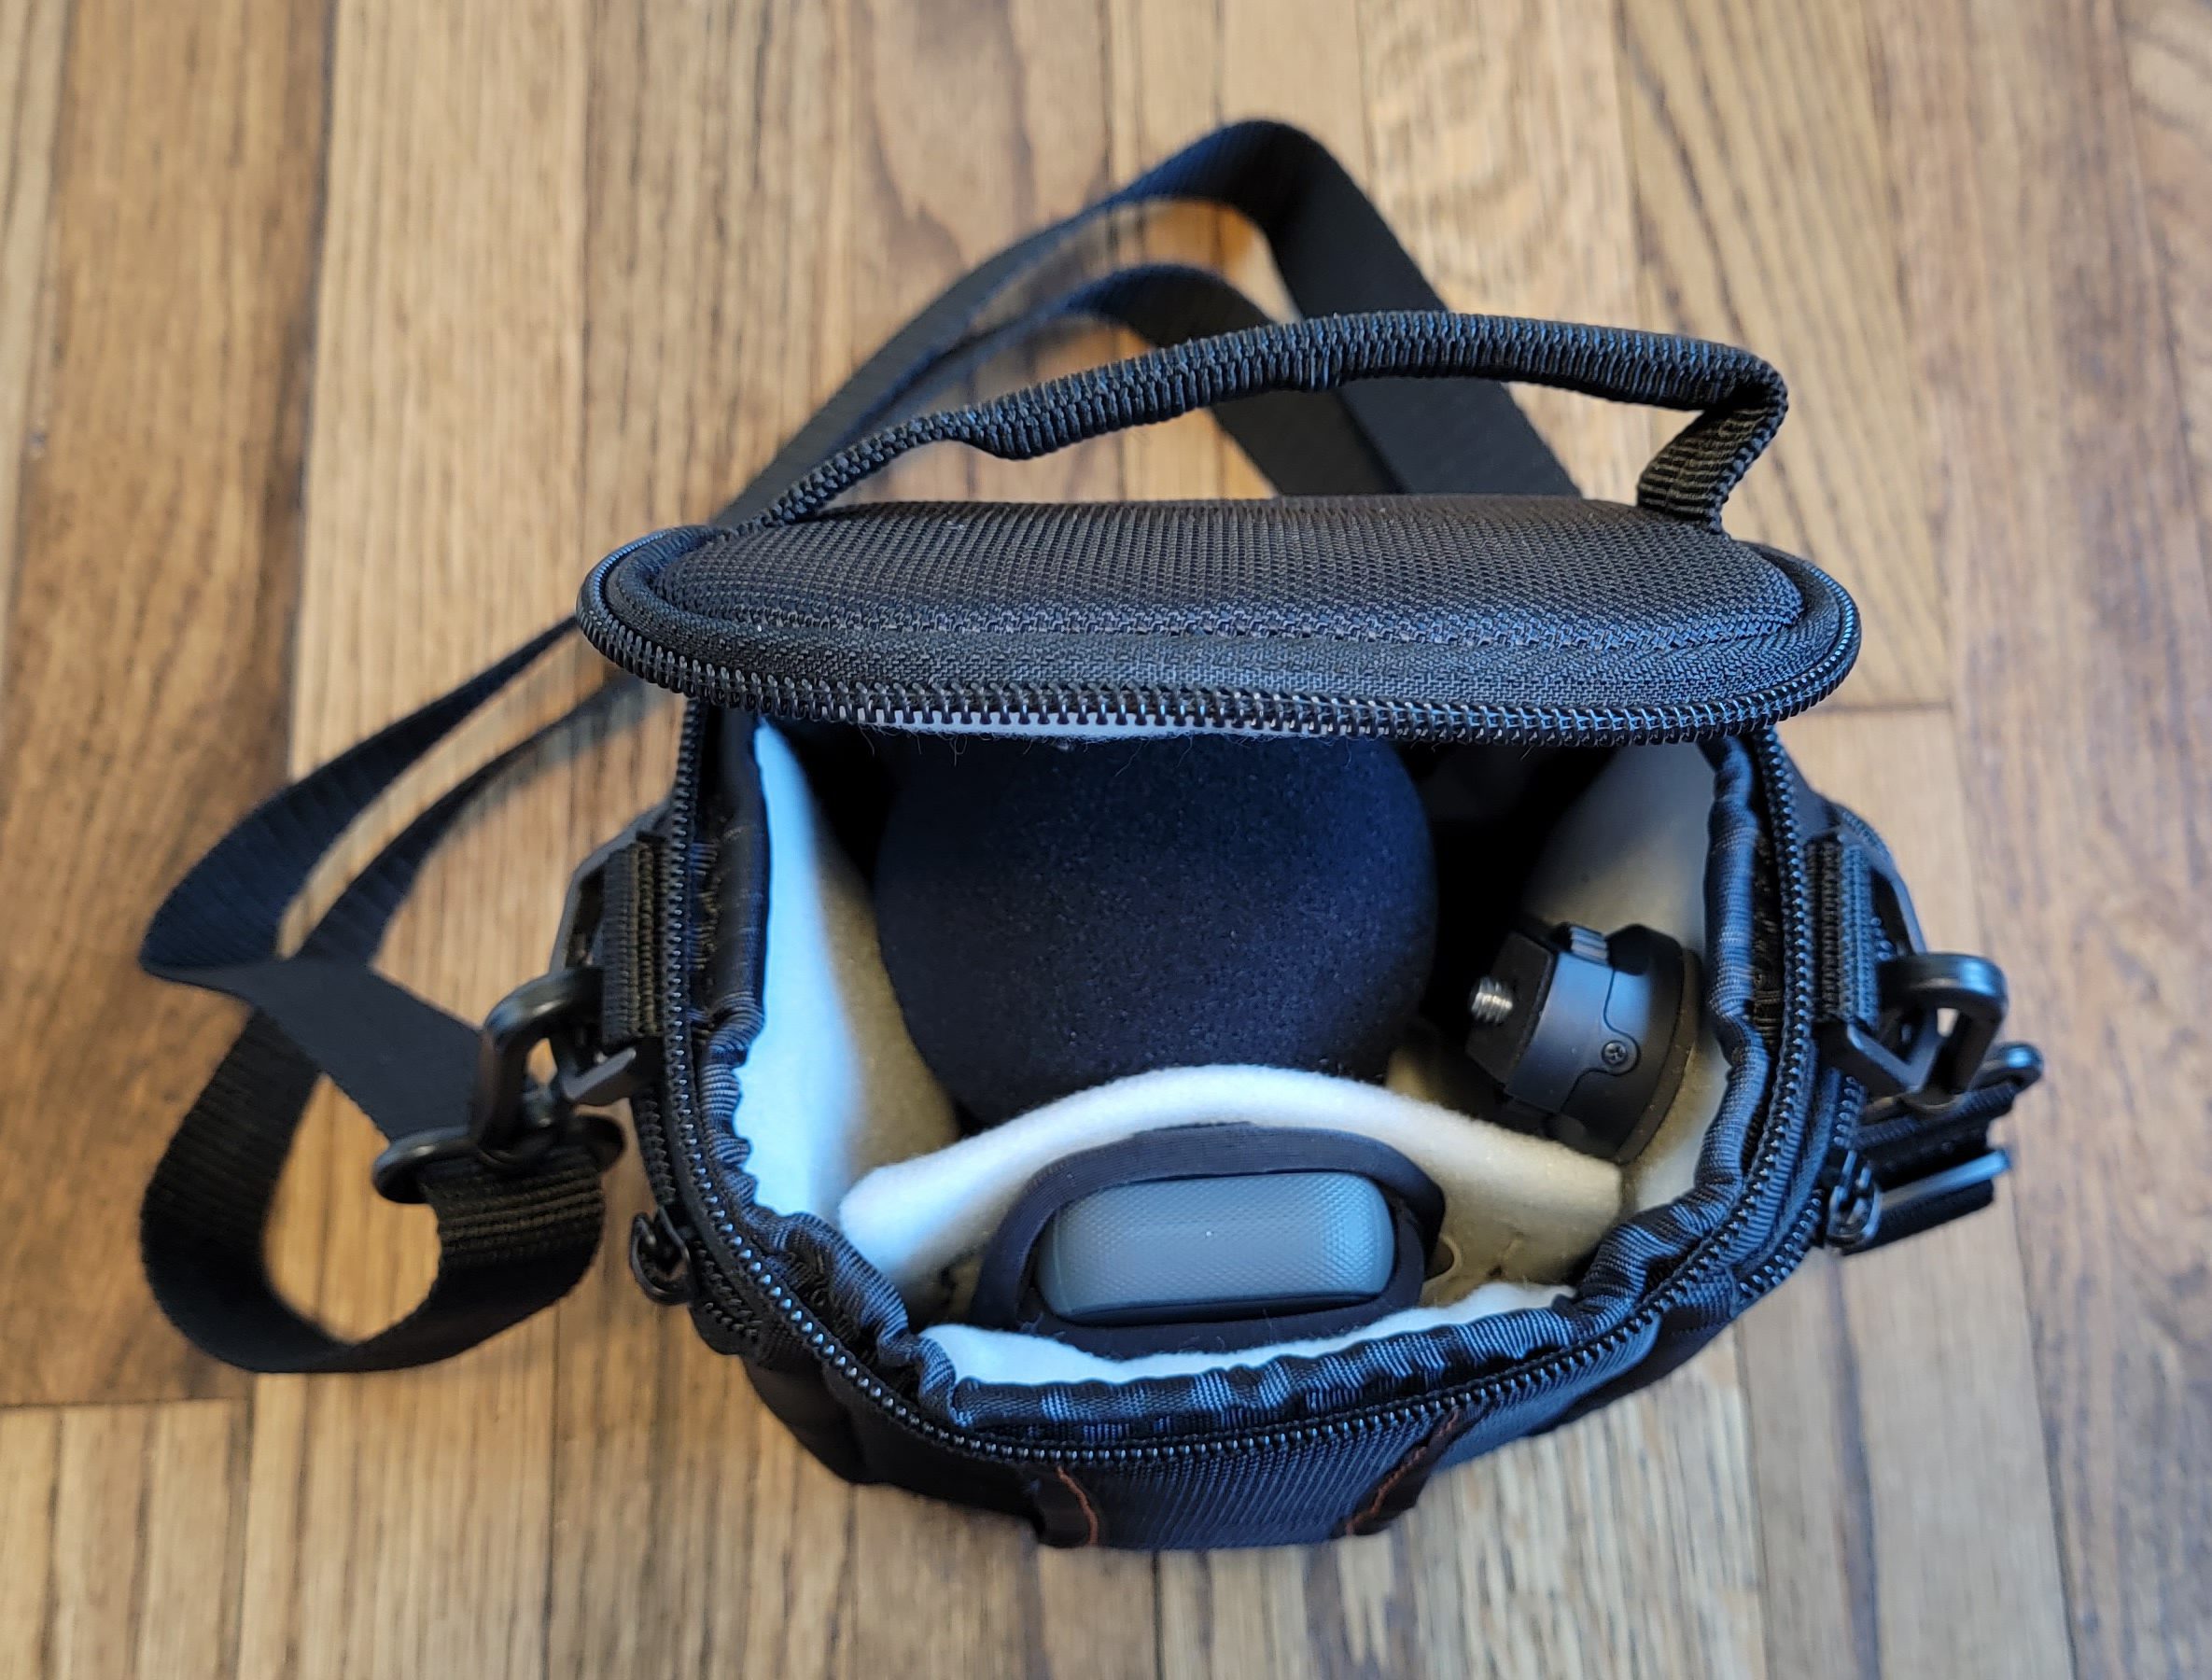
Gadget Bag
You’re going to need something to hold the camera, microphone, and cables so I recommend a small gadget bag. I’ve got a picture below to show you how it looks with all of the equipment inside.
Video Editing Software
You’ll need access to video editing software that allows you to merge the camera’s video with microphone’s audio. I highly recommend Adobe Premiere Pro as it’s the leading editing software. There are plugins to make processes like importing video easier and there are many video tutorials to explain what to do.
VR Headset
The video you’ll record is best watched with a VR headset. I am currently using and recommend the Oculus Quest 2. It works great, seems to be the most popular option, and costs $299.
Insta360 ONE X2
The Insta360 ONE X2 requires you to to have a device like a phone or tablet to set it up. You have to download an app (on Android or Apple) to get going. The app will walk you through the set up process, but getting my phone to connect to my camera felt like a clunky experience.
Once you’ve connected your camera to a device, this set up video was helpful for me to figure out how the buttons worked as well as some of the optional settings.
You’re going to want to download the free Insta360 STUDIO software. They have versions for Windows and Mac. This software will allow you to take the two video files created by the camera (one for both the front and back cameras) and merge them into a single file you can edit. If you are using Adobe Premiere Pro, you should install the plugin that allows you to import Insta360 videos directly into Premiere Pro. Once you install that plugin, you should never need to use Insta360 STUDIO again. Otherwise you have to use Insta360 STUDIO to turn the files into something you can edit in a video editing program, which would take some extra time.
You’ll also have to insert the MicroSD card (you should never need to take it out again) and charge the camera.
Zoom H3-VR
The microphone is much easier to set up. I found this video useful in setting up the microphone (watch until around 10:18). You’ll also have to put in the two AA batteries and insert the MicroSD card (you should never need to take it out again). From what I can tell so far, the AA batteries last a long time (it still shows a full charge after 10 hours of recording), but it would probably be worth putting spare batteries in the gadget bag.
- This is the Insta360 ONE X2 camera. The big light circle on the front is the screen which is showing the wall behind it.
- This is the Zoom H3-VR microphone with the noise filter on it. It’s mounted upside down. The blue rectangle is the screen.
- This is the adapter that comes with the Zoom H3-VR and attaches to the stand so that you can mount the camera and microphone vertically.
- This is the tripod.
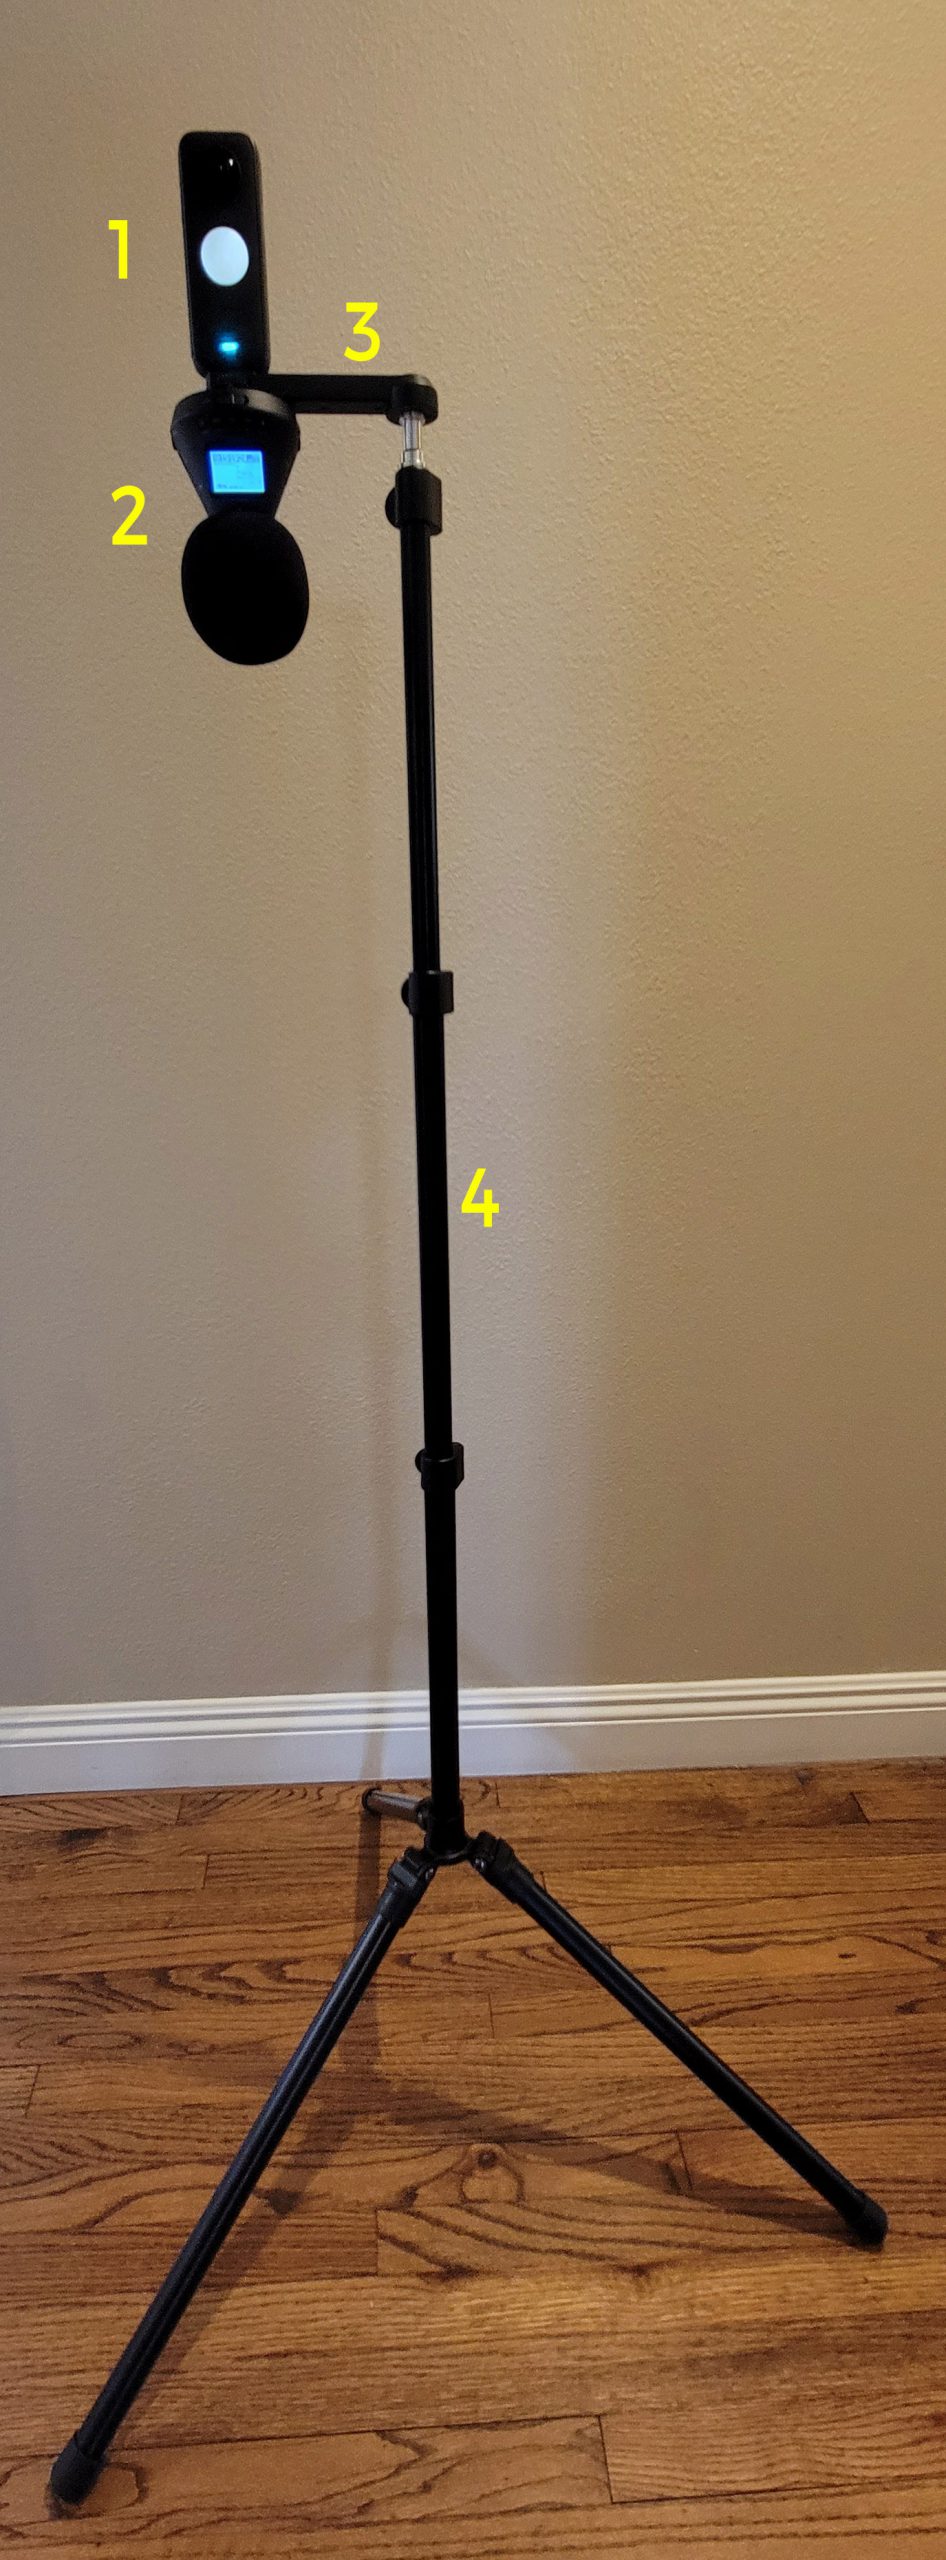
All of it fits snugly in the gadget bag except for the stand.
- Make sure that the camera is fully charged and that the microphone battery level (in the top right of the microphone’s screen) is at least 2/3 full.
- Set up you tripod so that it’s your desired height and the base legs feel stable.
- Attach the black, plastic mounting adapter provided with the Zoom H3-VR to the tripod. Then mount the camera on top of the adapter with the microphone on the bottom so it looks something like the picture above.
IMPORTANT NOTE: Both the camera and microphone have a front or “north”. You want those to be aligned as much as possible. Sometimes you might forget to check this and the microphone might face the backside of the camera. Now when you import the audio, you’ll hear stuff that’s behind you appear to come from the front or vice versa. This can certainly be fixed while editing, but it’s much easier to double check this before you record. You want the side of the microphone with the display on it to be facing the exact same direction as the side of the camera with the screen. I once recorded with it ever so slightly out of alignment and it felt like sound was coming from the wrong places. - Place the tripod with camera and microphone in you desired location. Here are some tips about camera placement (same link as the video about camera height).
- Turn on the camera and microphone and start recording on both of them. It’s not important to have them start at the same time as this can be very easily synchronized during editing.
- To record on the microphone, slide the power switch to the power side (away from the “HOLD” side”) and then press the button with the red dot on it between the screen and the “ENTER” text. To stop recording, press the button with the red dot again.
- To record on the camera, press the power on the right side. If the menu is not showing on the screen, tap the screen once to bring up the menu. Towards the bottom and a bit to the left, there should be an icon for either a camera or a video camera. If it’s a camera, tap it and a menu will appear. Choose the video option and either standard or HDR recording. It will take you back to the home screen. The press the circular button below the screen to start recording and again to stop recording. Note that you can technically also start and stop recording using the app. However I found that to be less reliable. It would sometimes turn off and on and make more beeping noises.
- After recording the classroom footage, turn off the camera and microphone.
-
Get the recording off the Insta360 ONE X2 by turning on the camera, opening up the side flap that has a USB-C port, plugging a USB-C cable in that’s connected to your computer, navigating to the “DCIM” -> “Camera01” folder, and selecting the files to copy to your computer.
While you may be used to seeing one video file for each recording, it’s different with the Insta360 ONE X2. First, there may be two types of video files listed. The ones that begin with “LRV_” can be ignored as those are low resolution versions used for previewing the video. The ones you want will begin with “VID_” and end with “.insv”.
Each video clip will consist of two separate files: one from the front camera and one from the back camera. You’ll know that they’re a pair because their file name will be basically the same except one will have a “00” and the other a “10” in the file name. You need to copy both of them. For longer recordings, the camera will separate the footage into 30-minute files. You’ll need to copy all of them. Be sure to firmly close the camera flap when you’re done.
- Get the recording off the Zoom H3-VR by turning on the microphone, plugging in a Micro USB cable that’s connected to your computer, selecting “Card Reader” from the menu, and selecting the “.wav” file(s) to copy to your computer. For longer recordings, the microphone will separate the footage into 60-minute files. You’ll need to copy all of them.
- You now have the audio and video footage on your computer and ready for you to edit.
- Open Adobe Premiere Pro and create a new project.
- Next, you need to create a new sequence. This video (watch until 1:41) will get you started and I’ve listed the specific settings I use below.
- Timebase: 29.97 frames/second
- Frame Size: 5760 h x 2880 v
- Pixel Aspect Ratio: Square Pixels (1.0)
- Fields: No Fields (Progressive Scan)
- Working Color Space: Rec. 709
- Sample Rate: 48000 Hz
- Tracks tab: I used the exact same settings
- VR Video tab -> Projection: Equirectangular
- VR Video tab -> Layout: Monoscopic
- VR Video tab -> Horizontal Captured View: 360°
- VR Video tab -> Vertical: 180°
IMPORTANT NOTE: Before you create the new sequence, there is a “Save Preset…” button near the bottom of the “New Sequence” window. Save the preset and give it a name you can remember like “Insta360 Video Settings”. Then the next time you need to create a new sequence, you can choose this as an option under “Available Preset” -> “Custom” and won’t have to reenter the individual settings again.
- Here’s how you can import (watch until 0:48) the audio files (the .wav files) and the video files (.insv files) into the project. The Insta360 plugin for Adobe Premiere Pro will automatically stitch the front and back camera videos together to make a single 360 degree video file. You should now see your audio and video files in the lower left portion of Adobe Premiere Pro.
- Before you can work with the audio file, you have to change its settings. By default, Adobe Premiere Pro treats the Zoom H3-VR as four separate clips instead of one clip with four channels. This video explains how to change the settings (watch until 2:35).
- Now drag your audio and video files to begin editing. Your video should take up one video track and one audio track. Your audio file should take up one more audio track.
- Your audio and video tracks will likely be out of sync initially so that what you’re hearing doesn’t match up with what you’re seeing. Thankfully Adobe Premiere Pro has a built in tool (watch until 1:58) to synchronize them. Remember that for videos of over 30 minutes, the camera footage may have 18-second gaps when it was saving and there is no video to match the audio.
- You can now edit the footage as you normally would including trimming the beginning and ending so that the audio and video start at the same time. You can also turn the footage into multiple shorter clips or leave it as one longer clip.
- Be sure to mute the audio track from your Insta360 ONE X2. By default you’d hear both that audio and the Zoom H3-VR microphone’s audio. I can tell you from experience that it’s no fun having to wait another three hours for the movie to finish exporting because you forgot to mute that audio.
- When you’re done editing your video and ready to export it as a completed video, watch this video (watch until 4:52). Be sure to click on the “Output Name” so that you know what the video file will be called and where to find it. I used all the settings in the video except I made these two changes:
- Preset: VR Monoscopic Match Source Ambisonics
- Frame Layout: Monoscopic
Note that exporting 360 degree video takes SOOO much more time than it takes to export regular video of the same length. For example I can normally export a one-minute video in a couple minutes. Exporting a one-minute 360 degree video took about fifteen minutes. Exporting a 40-minute video took close to three hours.
- Once your video file is done exporting, you can use a free program like VLC media player to see what you created. It supports 360 degree video and is available for Windows and Mac.
- If you want to upload your video to YouTube, here’s what you should know. While uploading the file takes about as much time as it does to upload a non-360 degree video of similar file size, it takes YouTube a lot more time to finish processing the video. When you first upload it, it will appear as a low resolution video that is not 360 degree video. Over the next hours you’ll see higher resolution versions appear and it should become a 360 degree video. It’s taken as many as 20 hours to fully finish processing. When I first uploaded it, I thought I had done something wrong because it was not immediately a 360 degree video.
- How to Watch a 360 Video – This super short video is great to use with people who’ve never watched a 360 degree video before. It helps you get used to looking up, down, and all around.
- How to watch 360 video on your phone in “VR mode” – While watching 360 video is best done using a VR headset, this video gives you some ideas about affordable options for watching videos on your phone.
- Camera placement tips – If you’re planning on recording your own 360 degree videos, this video helps you think through the pros and cons of where you place your camera when recording including what height the camera should be placed at (SPOILER: Somewhere between 5′ and 5’4″ is ideal). From my own experience, I’ve learned that putting the camera in the middle of the room to record everything basically means that you see nothing well. The camera needs to be near one cluster of students.
Recording longer videos
It’s been my experience that when using the Insta360 ONE X2 to record long videos, it will record 30 minutes of video, then pause for about 18 seconds to save the video, and then continue recording. So there will be short gaps in your video if you record for longer than 30 minutes.
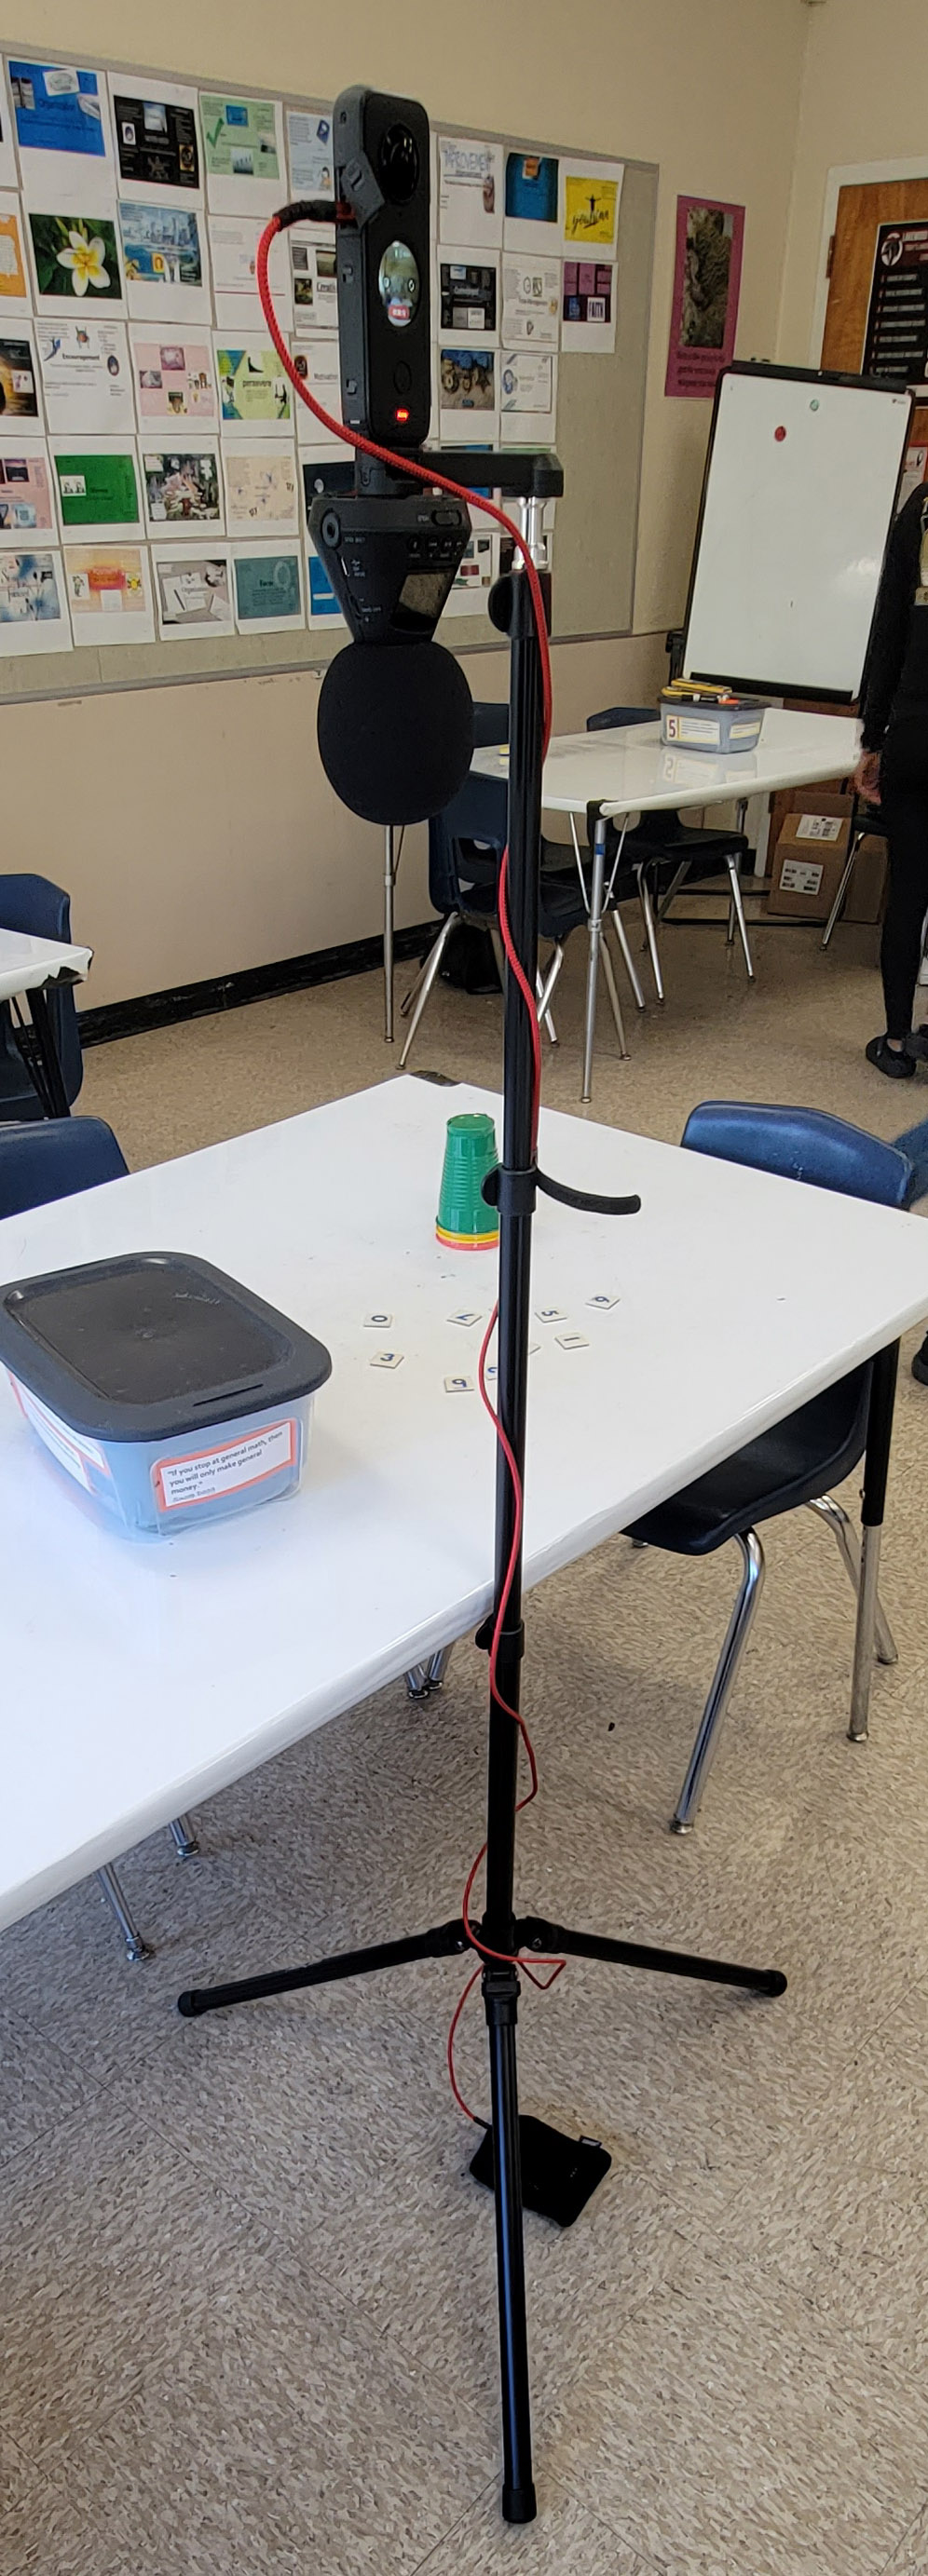
The Insta360 ONE X2’s battery seems to last for about 80 minutes of recording. It goes from 100% to 5% and then turns off. This may not be an issue for shorter videos, but it won’t last through longer block classes. My solution is to connect a long USB-C cable (6 ft should be fine) to the camera and then connect the other end to an external battery on the ground by the base of the camera with the cable wrapped around the tripod. See the image below (click on it for a larger version). The picture below shows what it looks like. NOTE: I later realized that by doing this method, the camera flap and the USB-C cable somewhat appear in the video. So unlike what you see in the picture below, be sure to push the flap so it’s horizontal and not really sticking out past the side of the camera. Also try to have the USB-C cable go straight down the the microphone and then wrap around it near the foam cover. This will make it less visible.
If you’ve got a big enough external battery, the camera should be able to record for hours or until the memory card is full. Also, the Insta360 ONE X2 charges back up from around 5% to 100% in about an hour when you charge it via a USB-C cable that’s connected to an outlet. The Zoom H3-VR microphone’s battery seems to last a very long time and it’s still showing full after 10 hours of use.
YouTube tutorial videos are rarely perfect matches
There are many videos on YouTube and most are quite helpful. The problem is that few to none will be using your exact set up so you’ll have to adjust accordingly. For example, there are many videos on how to use the Insta360 ONE X2 with Adobe Premiere Pro, but they may have been recorded a few years ago with a different version of Adobe Premier Pro than you’re using. Some of the places they said to click may no longer exist and issues they describe may have been resolved (for example you used to need a plugin to use 360 audio but now that is a standard feature… and this change wasn’t immediately obvious to me). Similarly they might use the same camera and software version but use a different microphone. So it will be helpful but rarely a perfect match.
Choosing a default view
When a 360 degree video loads, it is going to show some view by default. The user can look where they want once it loads, but by default it would probably be more helpful for the video to face the teacher or students than it would be to face the back of the classroom. Here’s a video to show you how to change that default view. Note that if you change the default view, your microphone’s audio will no longer match up to the video. So, you will need to find the “Panner – Ambisonics” audio effect and apply it to your microphone’s audio track. Then for the “Pan” setting, you’ll adjust that as needed. For example, I needed to rotate the camera so the back was facing the front. That required a 180° value for “Pan”.
The mathematics of other rotations can be no fun. By default, the center is set to 2880 by 1440. You need to shift it 1° for every 16 pixels. So 180° would be the full 2880. However, I’ve had to do an offset of a random value like 2272 pixels. Dividing 2272 by 16 gives you a value of 142°, but then it’s still not immediately obvious as to whether it should be a positve or negative rotation (AKA a clockwise or counterclockwise rotation). What I’ve come to realize is that when the Offset’s “Shift Center To” value becomes less than 2880, it’s a negative rotation and when it becomes greater than 2880, it’s a positive rotation.
Writing becomes illegible unless it’s very close
It’s surprising how quickly writing becomes illegible. Pencil or pen on paper two feet away from the camera is practically invisible. Black whiteboard marker with large letters on a clean whiteboard is viewable about 4 feet away but at 6 feet with regular writing, it’s just a blur.
Face the camera toward what’s important
The 360 degrees which the camera sees comes from two cameras each capturing 180 degrees and being stitched together. For the most part, this works great, but at the edges where the two cameras’ footage is stitched together, you can see some ghosting where you barely see two of something because it’s captured a bit by both cameras. So, if you know what you want to focus on, make sure a camera lens is facing that so that the edges are on less essential things.
Adding text/images to your video
You may find it useful to add text or images to your video. For example you might want to add a logo or bring attention to an interaction. This tutorial was very useful for me (watch until 5:21). When you import an image or video, by default it will appear in the very center of your video. When you want to move it, do not use the settings under “Effect Controls” for “Motion” including “Position” or “Scale”. Instead, use these settings under the “VR Plane to Sphere” effect:
- “Scale (Degrees)” makes it larger or smaller
- “Rotate Projection” -> “Projection Tilt (X axis)” moves it higher or lower
- “Rotate Projection” -> “Projection Pan (Y axis)” moves it left or right
- “Rotate Projection” -> “Projection Roll (Z axis)” rotates it clockwise or counterclockwise
While it was fairly easy to just move text/image in one direction (for example along the X axis using “Projection Tilt”), when you did more than one direction (such as moving it over to the side AND up), the text started to rotate in unexpected ways. I wound up having to also use “Projection Roll” to rotate the text back to what I was expecting.
Also, if you are using text, here’s a very importantant tip: make sure to horizontally and vertically align the text before you start your rotations. All the transformations rotate through the center of the text, but if it’s aligned left, the text will rotate in funky ways.
Bungalows are not ideal
Classrooms with solid concrete floors are much better for recording than bungalows on raised foundations with wood floors. Those floors wiggle a lot and it makes the camera shake, especially if people are walking around.
Captioning your videos is critical
The short version is ALWAYS caption your 360 videos. The longer version is that students might all be talking at once, might be speaking quietly, or might be far away from the microphone and it can be really hard to make out what they’re saying. When I’m editing the captions, sometimes I’m honestly not sure what I said, so if I can’t tell, then viewers can’t tell. The captions move to wherever you look, so that works well. It may be important to label who is saying what because while you might know what was said, it can make following the conversation challenging when you don’t know who said it.
You’re going to need a practice video
As of 2023, most people are unfamiliar with watching 360 videos. It’s a newer experience to be able to see something different depending on where you look. So before you use this type of footage in professional development, it’ll be important to create and use a short practice video that gets people to look around the room. Here’s what my video looks like.
Please let me know your thoughts in the comments. What are you excited about? What questions do you still have? What parts could I better explain?
Wow, I’d never considered this use for this technology. It’s basic telepresence, now possible with somewhat affordable technology (used to be way unaffordable, so that’s an improvement). Can’t wait to try it. I imagine it creates an immersive experience of being there. This gives me a reason to get a Quest.
Thanks Scott. Yes, it is absolutely an even more immersive experience with a VR headset. It feels like so much more of an authentic way to talk about lessons than with a traditional back of the classroom camera and microphone.
At first brush this feels super creepy and big brother. How do you envision using this?
One of the most consistently valuable professional learning experiences I’ve had has been getting into other teachers’ classrooms and learning from them. Even better than that is lesson study (https://robertkaplinsky.com/lessons-learned-lesson-study/) where teams of teachers create a lesson, teach/observe it, make changes, and teach/observe it again.
Unfortunately it’s a logistical and financial challenge to get teachers out of their classrooms and into other teachers’ classrooms. For example you can only fit so many teachers in a classroom before it becomes awkward, there’s never enough subs or money, and the truth is that not every lesson is super valuable to watch. Even if you do have teachers in the class, you might not see that amazing moment because you were somewhere else.
An alternative has been recording lessons and showing the video in professional development, but those videos are never satisfying because you can’t really see/hear what you’d want.
To me, this is an unfathomably helpful option. You can record lots of videos and then save the most useful parts. Then, you can use them in professional development and it’ll feel almost like you were actually there. And everyone can be there to see it without actually interrupting the lesson.
What do you think?
Wow Robert, way to document all the steps of this uncharted territory! I recently had a conversation with Graham Fletcher and he talked about the idea of wearing a Go Pro so you see the classroom from a 1st person view (teacher OR student depending on who you strap the camera to)… but this 360 view really opens up possibilities for classroom observations, instructional coaching, and lesson study. I could see benefits in being able to re-use the same video multiple times for different observation lenses. “This time when you watch, just observe the interactions of the students at ___ table.” or “As you watch, just observe for this teacher move…”
Logistical question- do you have a strong video permission slip that you use to get parent permission prior to videotaping? I agree w/ A Paye above, having a general video capture is one thing, but 360 view of video/audio takes it up a notch in terms of surveillance. I see the benefits in terms of teacher professional development, but also can see the caution in allowing this new level of video footage in the classroom. Wondering if students/families know in advance or if you have to ask for different permission than traditional videotape footage?
Yes, you are totally right in that you could watch the same video multiple times for a different observation lens. We’re just beginning to imagine the possibilities.
Regarding the permission issues, yes, I absolutely use a broad permission slip. I believe it to be sufficient. A challenge I’ve come to realize with using 360 video instead of traditional cameras is that you can no longer place student out of the way of the camera. For example I used to put kids who did not have permission in one corner and never film there. That’s no longer an option.
So it will take some thinking and planning that is different than what’s been done in the past.