
UPDATE (1/23/23): If you like these tips, you might also like this webinar called Five Steps To Create Captivating Keynote Presentations where I shared the entire process I use to create my conference presentations.
Over the last fifteen years, I’ve attended or presented hundreds of sessions at conferences and workshops. During this period I collected a mental list of what makes some presentations better than others. I decided to write that list down and share it with you because I would have really appreciated having it when I first started presenting.
These aren’t listed in order of importance but rather grouped into categories. Many of these are likely common sense to you, but some will be new. As always, if you have a tip or two that I missed, I’d love to read about it in the comments.
- The text on your slide needs to be at least 32 pt so that everyone can easily read it. You can choose to go smaller but there’s a good chance that people in the back won’t know what it says. This might require you to remove some of the text or break it up into multiple slides.
- If you are using a screenshot that has text on it and aren’t sure what size the text is, remember that you can compare the text in the picture to size 32 text you type, and then shrink or enlarge it accordingly. If for some reason you can’t make the image bigger, than maybe you shouldn’t use it because no one will be able to read it anyway.
- Don’t be afraid to make text on one slide larger than text on another slide. If you’ve got the empty space on your slide, go ahead and enlarge the text because it makes it easier for people to read.
- Update (11/10/18) – Try your best to never have more than about 10 words on a slide. You don’t want to read that when you’re watching a presentation and they don’t want to read it either.
- Update (11/10/18) – If you are using bullet points, please animate them so they come in one at a time. Otherwise it is a lose/lose situation. Your audience will see an overwhelming amount of text and be lost. They also won’t be listening to you because they’ll be reading the next bullet point instead.
- If you are planning on playing a video in your presentation:
- download it ahead of time so that there is no chance that the video that won’t play
- embed it into the presentation itself so that you don’t have to switch out of the presentation to play it.
- put it on its own slide and make sure it is set to play automatically (as opposed to having to click on it) and that it will automatically play full screen. No presenter wants to have to walk back to the computer and click play nor do any attendees want to see a small video on a portion of the screen when it could easily play on the entire screen.
This is a great list, Robert! One thing I would add is to make sure all videos are captioned. The captions provide access for folks with hearing impairments, and they really help everyone, especially if the sound in the room is poor/not working. I use https://t.co/NjF3yxaXCe.
— Tracy Johnston Zager (@TracyZager) January 8, 2023
- If you are doing a tech presentation, always assume that the technology is not going to work. This is not hypothetical. It is fairly common for the Internet to become painfully slow or unavailable when everyone at the conference tries to connect and do what you said at the same time.
When you think starting a presentation with a @Desmos marbleslide is a good idea and then 300 people all try to get on the Wi-Fi…
— Mary Bourassa (@MaryBourassa) May 4, 2018
Ideally, you want to have a backup plan. For example, if you are doing a presentation Desmos’ Marbleslides, clearly it would be ideal to let people play with it, but you could also take screen shots or make videos of how it works. You can then put that content on slides that you hide and only use when you’ve got no other choice.
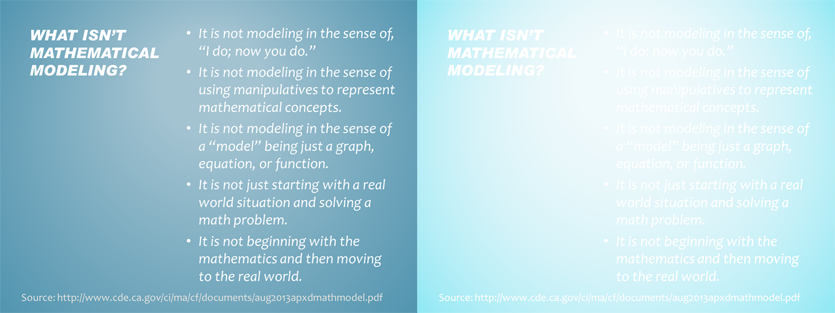
- Always have enough contrast between your colors to make sure they are easily visible. For example, I used to use the slide below on the left in my presentations. It looked beautiful on my monitor but once in a while I would use a digital projector whose bulb was dying. As a result, the colors would get washed out and it looked closer to what shows on the right. Obviously no one is reading that easily.
- Also, don’t forget that ~4.5% of the population is colorblind so consider these color recommendations.
- When I first started making presentations, I always began with PowerPoint and created my slides using the program. Then I read Weekend Language and it talked about using a two-column method (I talk about it more here under “Step Two”) where one column is for the visual and the other is for the text/message. Dan also mentions this technique in his blog post about how he presents. The benefit of using this two-column method is that you save the formatting until the very end when you are happy with what you’ll do. If you skip straight to making the PowerPoint, inevitably you’ll waste time formatting slides that you ultimately decide against using (or worse, you use slides you don’t like anyway because you’ve already spent so much time on them).
- One thing I always do for every presentation longer than 10 minutes (so not for an Ignite or ShadowCon talk) is create a timeline that tells me what I should be talking about at a given time. Here’s an example for a 90-minute presentation called Math Modeling Can Make You Filthy Rich.
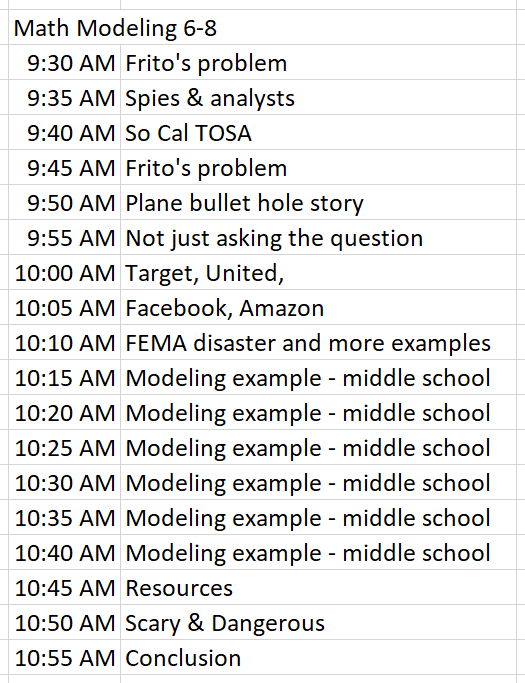
I love this because it helps me spend my time where I want to and minimizes situations where I realize I’m running out of time (or have too much left). For a presentation between 45 and 90 minutes, I will break it down into 5-minute chunks. For a full day presentation, I will break it down into 15-minute chunks.
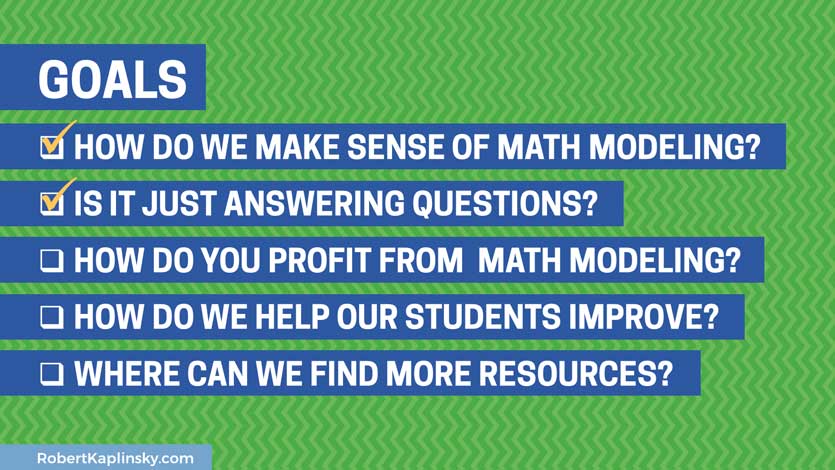
- Here’s another tip I learned from Weekend Language: use checkpoints to help your audience know what you’re going to cover. Then return to those points after you complete each section so that they can follow along and understand what’s been covered and where you’re headed. Here’s an example from my Math Modeling Can Make You Filthy Rich presentation.
- If you are including an image, make it take up the full screen. Sometimes people will put an image on a small portion of the screen, but I’m not a fan of that. If the image is important enough to show, why not make it as big as possible so everyone can see it?
- When you are looking for an image, try to avoid using stock photos. As an example, check out the results of two searches for “education” (option 1 and option 2). Personally, I try to avoid using the kind like you’d find for option 1 where it can look cheesy and staged. So, consider using:
- Death to Stock Photo
- Creative Market
- Deposit Photos
- Unsplash – suggested by Michaela Epstein
- Pexels – suggested by Michaela Epstein
- Pixabay – suggested by Michaela Epstein
- Every Pixel – suggested by Michaela Epstein
- EDUimages vby All4Ed – A free library of photos of students in action – suggested by Terri Eichholz
- You can never have enough stories in your presentation. Anything that is relatable, funny, embarrassing, or simply gets your point across is great. So, make sure you have something like a journal where you save all your stories so that when you are doing your next presentation, you can look at your list and use the ones that are relevant. I use a Google doc so I don’t forget mine. Be sure to add any metaphors, anecdotes, or analogies to the list too.
- One specific piece of advice I first heard from Paul Farmer and frequently use is “Start with your second best story and end with your best.”
- Update (2/17/23) – If you’re speaking somewhere like a conference and someone shares a picture of you on social media that you like, reach out to that person ASAP afterwards and ask them to email you a copy of the original image.
The version you download via social media will be lower quality. If you wait, you may forget who took it or they may have deleted it by then. The people I’ve emailed have always been appreciative that I asked so it’s not a big burden for them. I can then use those images in other marketing, my own social media, or similar.
- Always use a presentation remote. This is the one I use. Also, if you are buying a new one, consider getting one with a green laser (as opposed to a red laser). My friend and Open Middle co-founder Nanette Johnson is color blind and she can’t see the red laser at all unless it’s not moving.
Update (4/10/19) – I just moved to this remote that has a digital spotlight feature so that all monitors display a digital spotlight. It’s amazing.
- Assuming you are using social media professionally or have a website, make sure to include some of that information subtly on every slide. For example, you’ll notice on the image for “Checkpoints” that it has my website in the bottom left. Besides the obvious reality that people in your audience will have an easier time connecting with you, it will also make it so that if someone takes a picture of your slide and shares it online, people will know where it came from.
- Sometimes when you present, you find that you have something powerful and quotable to say. Often people have to paraphrase what you said, type it into their phones and tweet it out. However, one technique I learned from watching Sara VanDerWerf present (who is amazing and should be a keynote speaker everywhere) is to create slides with those powerful statements on them. This makes it easier for your audience to just take a picture of what you said and share it directly.
Update (4/10/19) – Here’s an example of what it looks like and how much traction it got:
Mic drop from @MikeFlynn55 at #NCSM2019 pic.twitter.com/8jnNhVGSEM
— Robert Kaplinsky (@robertkaplinsky) April 3, 2019
- Have a plan for what happens immediately before your presentation begins. Specifically, what do you want your audience to see, hear, or do? For example, I have lots of corny math jokes (like the kinds you’d find on t-shirts) that I play on a loop as people are coming in. It gives them something to look at and laugh about. It’s almost like an opening act that lightens up the mood. I also play music for a similar reason. What do you want to do? You could show pictures of your family, beautiful places in the world, or inspirational quotes. You could have people do math problems or introduce themselves to their neighbors. You could also choose to just show your contact info, but this is a valuable time that’s worth thinking about how you want to use.
- Presentations are often a balance of practical information that can be implemented right away and inspirational ideas that make you think. There is an implicit ratio for this balance that corresponds with the kind of presentation being given. For example, you would expect something like a TED Talk or Ignite talk to be almost entirely inspirational. Keynote presentations are similar, but maybe a little bit more practical so something like 80% inspirational and 20% practical. Somewhere a bit closer to the middle would be a workshop style breakout session at a conference. In that case, you’d expect something closer to 30% inspirational and 70% practical. I’ve also been to trainings to help me develop deeper content knowledge that were basically 0% inspirational and 100% practical. Make sure your presentation’s ratio is somewhere close to the expected range or there’s a chance your audience might be disappointed.
- If you are planning to include a Call to Action, please, please, please read this blog post first.
- Update (11/10/18) – If you have a lot to say and you’re afraid you’ll forget it, do NOT put it on the slide and read it from the slide. Instead, use the slides to put one or two word bullets that will remind you want to say. Then you can put notes in your presentation’s notes section. For example, I use PowerPoint and in the notes section, I’ll put text I don’t want to forget. Then I use “Presenter View” and make the notes section really large so I can glance at it when I need to.
- Update (4/10/19) – If you’re using a timer to have people work on something, make sure the instructions for what people need to do are on the slide with the timer. Otherwise, they’ll likely forget the details of what they were supposed to be working on.
- Update (11/8/21) – This may not be what you want to read, but few people want to hear about your life story during your presentation. Think about TED talks. No one EVER talks about their story unless their presentation IS about their story. Instead they go straight into their idea. There may be some value to showing why you are a credible source, but stick to that. You are making your first impression during the first minutes of the presentation. People want to know that they made a good choice coming to your session, and hearing you spend the first five or more minutes talking about your family, where you’ve worked, where you’ve lived, etc. is not what they want to hear. They want to know how you can help them so do the least amount of introduction possible.
- Finally, one presentation tip I learned from Dan Meyer and love is using a visual timer. To see what I mean, watch the short video below which shows a 30-second timer. You can see easily see how much time you have left without the stress of a clock.
If you like that and want to replicate it, here’s the basic process:- Create an image that is the height of the slide but a bit over twice the width. Most slide dimensions are now 1920 x 1080. So, your image should be something like 3850 (1920 x 2 + some wiggle room) x 1080. My image looks like this except the real one is larger:
 On one half, you will have the original image and the other half will have the “time’s up” image.
 - Insert the image into your presentation and put it in the background. This allows the “THINKING TIME” bar and the “RobertKaplinsky.com” bar to stay in front.
- Add a “Lines” type “Motion Paths” animation to the background image. That is what it’s called in PowerPoint but I imagine other programs have similar animation features. So, basically I am animating the image to go from the right side of the screen to the left side of the screen in a straight line.
- Next, set the timer for the animation. They give you default times, but you can make it whatever you want. I think the max is 12 minutes. So, “0:00:30 seconds” is 30 seconds but “0:02:00 seconds” is 2 minutes.
That’s about it. Obviously you could change the time, or the direction, or what not, but it’s a fun way to do timer animations.
- Create an image that is the height of the slide but a bit over twice the width. Most slide dimensions are now 1920 x 1080. So, your image should be something like 3850 (1920 x 2 + some wiggle room) x 1080. My image looks like this except the real one is larger:
Thank you for all of this very helpful information! I have just started doing presentations outside my own district, and this is a great resource to me at this time.
Thanks Maryanne. I’m glad there were some nuggets you found useful.
Awesome timing on this one, Robert. Planning about 10 too many presentations right now, and this post will work like an awesome check list as I move from one project to the other. Thank you!
That’s great to read, Leeanne. Hope your presentations go well!
Robert, this is SO helpful. I’ve been revising an early, very flawed draft of a talk and I feel like you’re showing me how to make that effort count. Also, some of these things, like the checkpoints or the visual timer, would never have occurred to me!
So glad you found it helpful Julie. It’s been a great learning process.
Is this a typo: presmiscentations?
Thanks for all of your fabulous free resources!
LOL, I’m speaking 3019 English. I have no idea how I never noticed that typo. Fixed now.
All good ideas and good reminders. Always nice to go read through the strategies and bring some of them that i had forgot back into my working memory.
Thanks.
One tip I would add is to blank the screen when you want the participants to focus on what you are saying. This way they are not looking at or trying to read what is on the screen.
Nice. Thanks for this addition.
Great tips! Another fav of mine: copresenters can plug in 2 clickers/remotes at once and click their own slides without having to share one clicker.
Oooh. I never knew this was possible. Great!
This is great information! I really like the timer bit. I will try that one whenever I present again. The scrolling math jokes on the screen is something I did when I had a smart board in my classroom and I enjoyed watching the students “get” the math puns.
One thing I have done every time I have ever presented so far is to bring a co-presenter along who has never presented before. I love building capacity with colleagues who have so much to share but would have never considered presenting.
Hey Esme. The idea of bringing a co-presenter along is something I have not done but really should consider more. Thanks.
Thank you for sharing. I especially appreciated the balance point. I never really thought about that until now.
Thanks Ryan. It’s something I have to remind myself or I can sound too preachy and not practical.
Hey Robert, fantastic post. Thanks for all the tips. I’d like to add to your list of places to go for high quality and free photos (something I have struggled with for ages):
– https://unsplash.com/
– https://www.pexels.com/
– https://pixabay.com/
– https://www.everypixel.com/ — compiles many sites
Thanks Michaela. I’ve used Pexels before but did not know about the others. Much appreciated. I’ll add them to the post.
Robert, any specific advice or blogposts on doing a keynote?
I don’t think things would change much for doing a keynote. I do keynotes and follow this same advice. What do you think might be different?
I was thinking about the content for the 80% inspirational piece and any issues surrounding the construction and delivery of that material. I am fleshing something out now for something coming up this summer. I am at the stage of mulling over some ideas and about to get them down on “paper” soon. I will try your two column approach…
These are great. I have a few things that I do that may be helpful (forgive me if you included them and I missed them):
I put the short link to my presentation at the top of every slide so people who come in late can access it. I use Google Slides, and publish the slides to the web so that people can see and refer to them, but not copy them.
This is a good presentation I’ve used with my students about what not to do: https://tinyurl.com/yzxto4t2
Another presentation that has great advice on what you should do is this one: https://tinyurl.com/yfs4txxu
And finally, this is a nice site to get pictures of students in action: https://images.all4ed.org/
Wow! The images of the students in action is INCREDIBLE! Thank you so much for that. Your other tips are great too. I don’t use Google Sheets but I appreciate that idea. Fantastic.
You’re welcome!
Hello! This is a great list! I never thought to put the quote on its own slide! And I’ve been someone in the audience trying to copy quickly so I can tweet it out!
I also like the very first suggestion on making a timeline for your slides.
Such great advice. Can’t wait to share with my colleagues.
Thank you, Tammy! You might also like this webinar: https://info.robertkaplinsky.com/captivating/
Thank you for these tips. I remember a presentation where the presenter showed “what this presentation is about” (very specific), and he also showed on the same slide “what this presentation is NOT about”, which included other general related information about the topic. Example: This presentation is about tips for presenting. This presentation is not about how to create a slide presentation.
Also: Bring a small bottle of water, in case your throat gets dry and water is not easily available in the room. Mints and/or cough drops may also be helpful.
Thanks for these additional suggestions, Shirley.